// Free brick build guide · Rust monument
Sphere Tank in bricks.
I rebuilt the Sphere Tank monument in bricks: the big rusty sphere on its eight columns, the walkways and the spiral ramp that climb round it, the railed deck on top with its raised ring walkway and crates, the stair tower, and the three silos beside it. Every piece is a standard brick part, and this page walks you through all of it, bag by bag.
- 3,045
- pieces
- 77
- steps
- 11
- bags
- 20 × 18 in
- footprint
- 15 in
- tall
- Advanced
- a sphere in rings

// Before you start
Prepare
A little set-up before you start saves a lot of hunting later.
Get the parts
The parts list at the bottom of this page has every piece with its part number, colour and count. Filter it by bag, then copy it as CSV for whichever parts shop you use.
Part and colour numbers follow the Rebrickable catalogue, and every part is made in the colour listed.
Sort by bag
The build runs in 11 bags, from the base and the columns, through the two halves of the sphere and its walkways, to the top deck, the silos and the greenery. Tip each bag's pieces into its own tray before you start and every step goes quicker.
Each bag ends with the tank in a state you can check against its picture below.
Clear a table
The finished tank is about 20 × 18 in (51 × 45 cm) with its base, and 15 in (37 cm) tall to the crates on top.
The lower half of the sphere is built beside the model first: it's 36 studs (29 cm) across with its walkway.
// The build, bag by bag
Bags
Jump straight to any bag. Each picture shows the tank at the end of that bag.
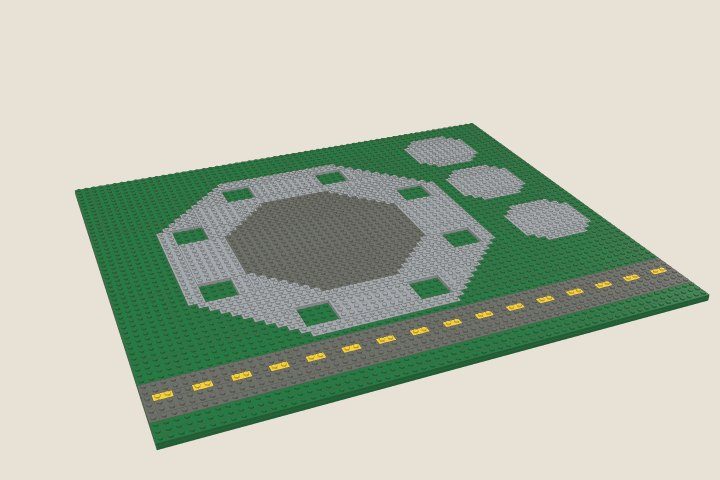
Base
The ground, the concrete octagon, the silo pads and the road.
322 pieces · steps 1 to 7Build this bag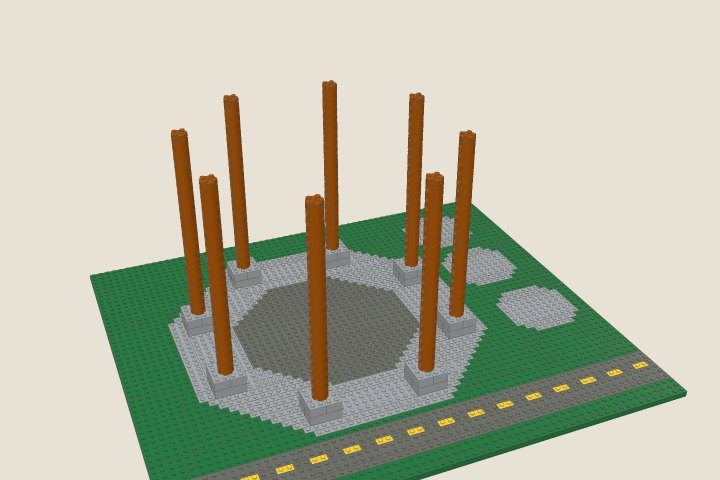
Columns
The eight concrete pedestals and the columns that carry the sphere.
224 pieces · steps 8 to 12Build this bag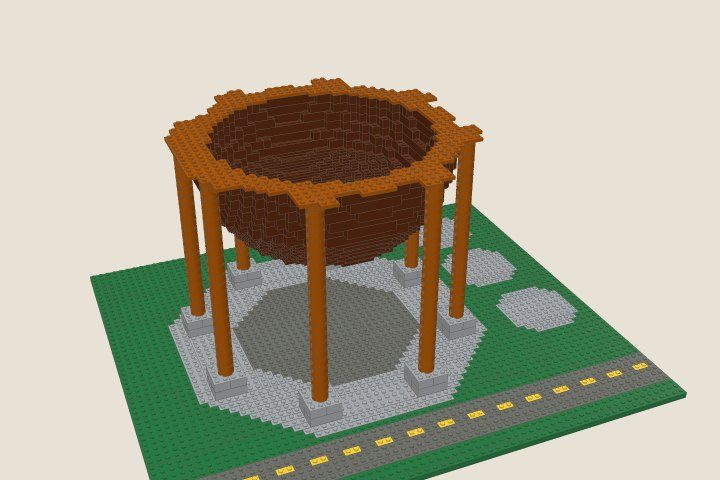
Lower half
The lower half of the sphere, built on the table and lowered onto the columns.
1,001 pieces · steps 13 to 19Build this bag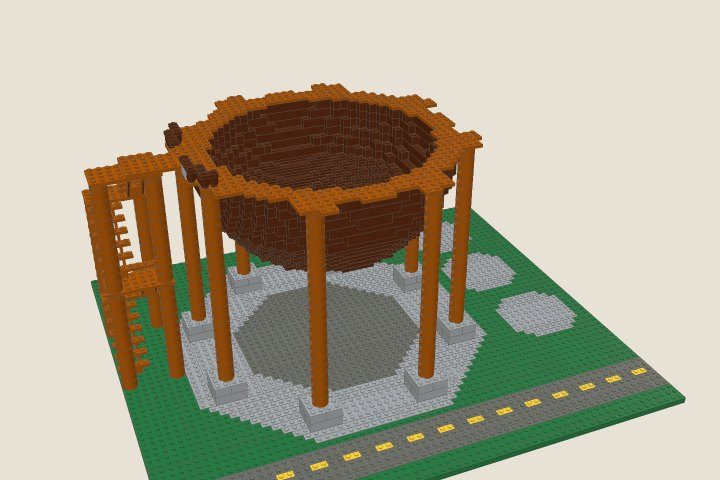
Stair tower
The stair tower on the west side, its four flights of stairs up to the equator walkway, and the walkway's railing.
116 pieces · steps 20 to 26Build this bag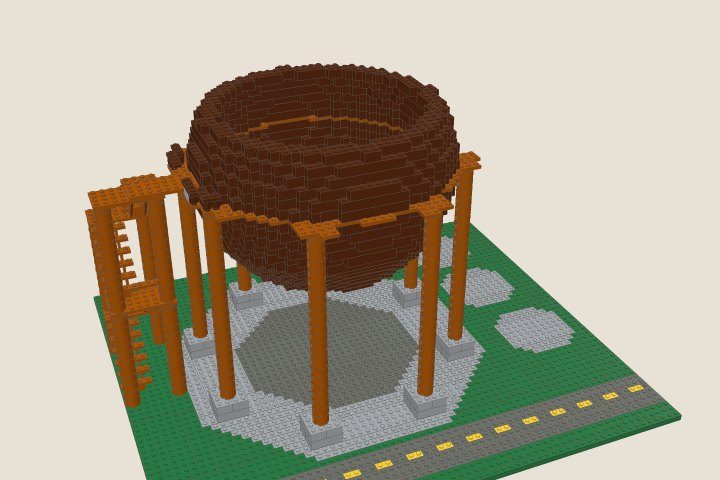
Upper half
The upper half of the sphere, from the equator up to the level of the upper walkway.
285 pieces · steps 27 to 32Build this bag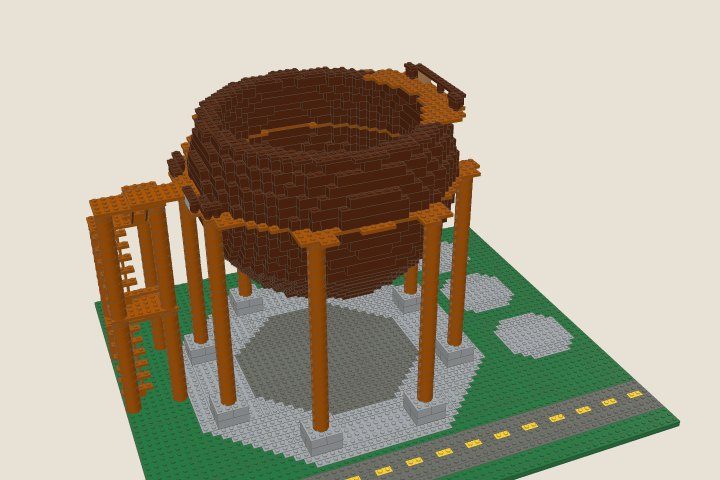
Ramp and upper walkway
The ramp that spirals round the north side of the sphere, and the upper walkway it climbs to.
102 pieces · steps 33 to 39Build this bag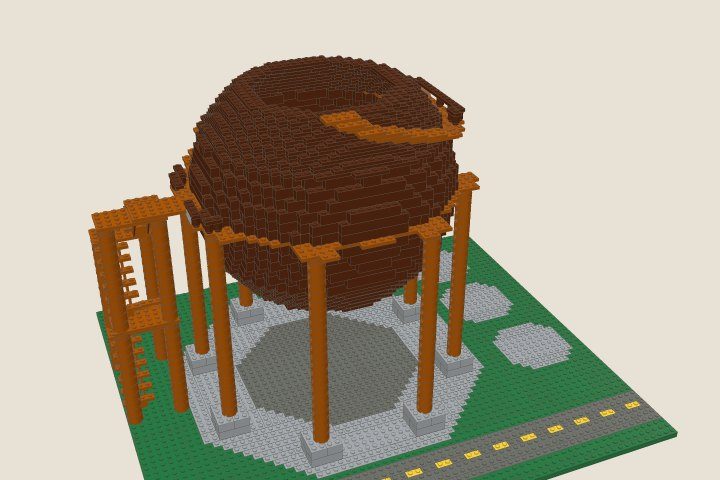
Top of the sphere
The rest of the upper half, and the second ramp from the upper walkway to the top.
457 pieces · steps 40 to 54Build this bag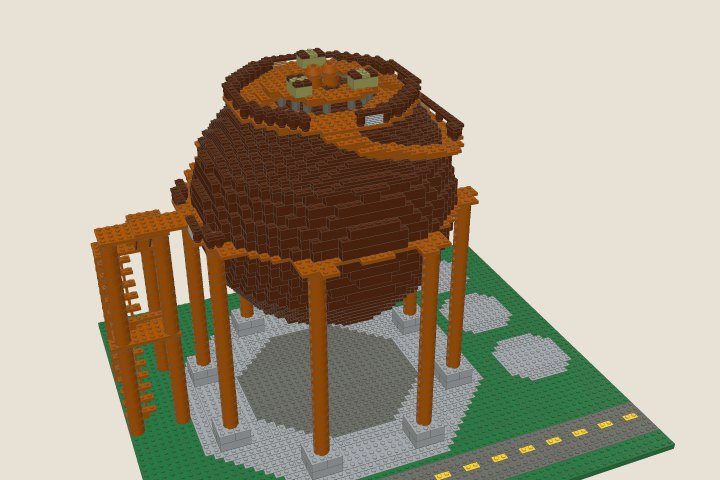
Top deck
The flat top: the lid, the deck, the cap, its vents and the raised ring walkway.
264 pieces · steps 55 to 66Build this bag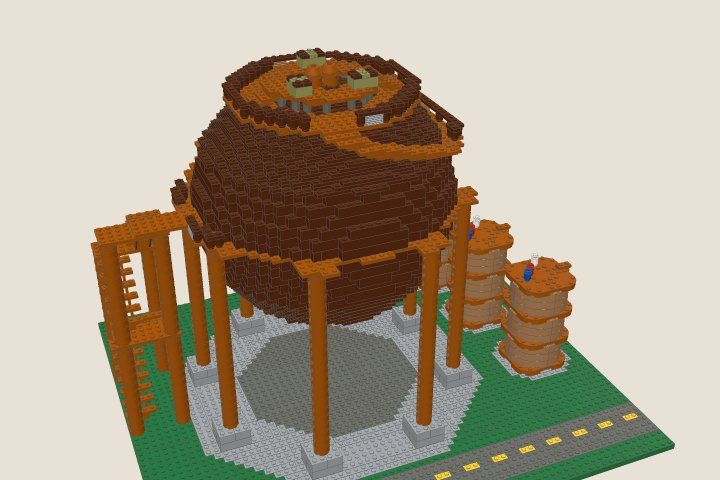
Silos
The three nougat silos east of the sphere, with dark orange bands, pipes and canisters on their roofs.
180 pieces · steps 67 to 72Build this bag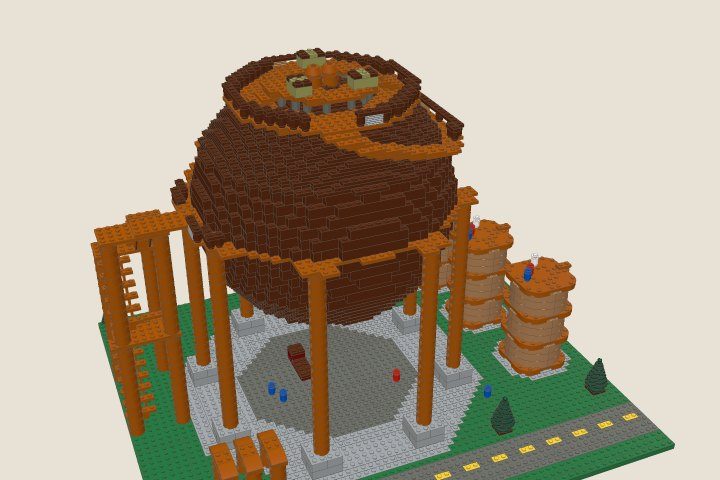
Pipes and props
The triple pipe loop, the rusty truck, barrels and pines.
61 pieces · steps 73 to 75Build this bag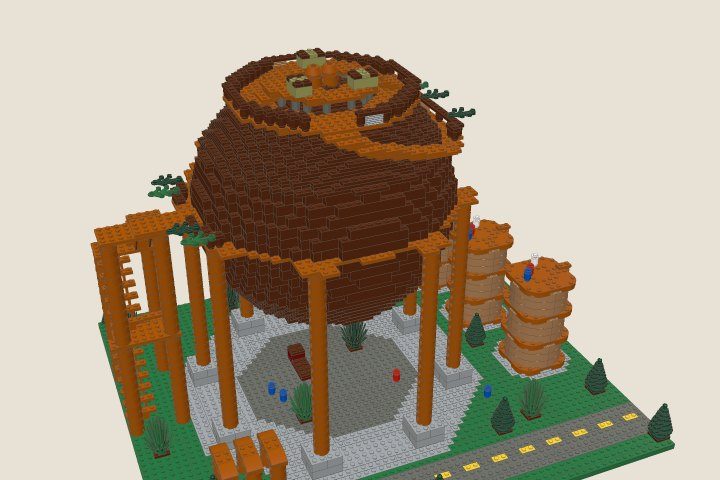
Greenery
Bushes, pines and the ivy growing over the walkway railings.
33 pieces · steps 76 to 77Build this bag// What you're building
The tank
Layout, proportions and colours come from studying the monument in gameplay videos, from the ground, the walkways and the air. This is what's in the model.
Sphere
A hollow sphere 32 studs across in reddish brown, built ring by ring: plates near the top and bottom where the curve turns fast, bricks round the middle.
Columns
Eight dark orange columns of round bricks on concrete pedestals, one at each corner of the octagonal pad. They meet the sphere at its equator, where a dark orange belt with a lug over each column sits on their tops.
Equator walkway
A walkway round the west side at the equator, with a railing of round posts and rails, a couple of fluted patch panels, and ivy growing over the rail.
Stair tower
Four flights of stairs switching back up a tower of columns and landings on the west side, with a bridge across to the equator walkway.
Ramps
A ramp spirals round the north side of the sphere a plate higher each step, resting on two of the columns where they carry on up past the belt. It climbs to a second walkway on the east side, and a second ramp climbs from there to the top.
Top deck
A dark orange deck with a railing all round, a low reddish brown cap with two vents, and a raised ring walkway on sixteen posts, reached by two short ramps, with three olive military crates on it.
Silos
Three silos east of the sphere, each 8 studs round in nougat with dark orange bands, a pipe up the side and red, blue and white canisters on the roof.
Round the pad
A concrete octagon with a gravel middle, a rusty truck and barrels under the sphere, a triple pipe loop, a road with its yellow centre line, bushes and pines.
// Every step, in words
Every step
All 77 steps as a list, bag by bag. Open a bag to read its steps; "Show in 3D" jumps the viewer to that step.
Bag 01 · Base322 pieces · steps 1 to 7
- 1
Ground
Lay the ground in green plates: 64 by 56 studs.
Build it straight on the table.
16 pieces · Show in 3D
- 2
Pad and road (part 1 of 6)
Lay the concrete octagon in light grey with a dark gravel middle, round pads for the silos, and the road near the south edge in dark grey with its yellow centre line. Leave the spots for the pedestals bare.
The second layer locks the ground together.
51 pieces · Show in 3D
- 3
- 4
- 5
- 6
- 7
Bag 02 · Columns224 pieces · steps 8 to 12
- 8
Pedestals
Build a concrete pedestal at each corner of the octagon: a plate and two courses of light grey bricks, 4 by 4.
The columns stand on these, so keep them square.
40 pieces · Show in 3D
- 9
Columns (part 1 of 4)
Stand a column on each pedestal: twenty-one dark orange 2 x 2 round bricks and two 2 x 2 round plates.
The columns run right up to the equator of the sphere.
56 pieces · Show in 3D
- 10
- 11
- 12
Bag 03 · Lower half1,001 pieces · steps 13 to 19
- 13
Lower half
Build the lower half of the sphere up from its bottom, course by course: each ring a little wider than the one below.
Keep each ring round; the diagram shows every course.
72 pieces · Show in 3D
- 14
Lower half
Build the lower half of the sphere up from its bottom, course by course: each ring a little wider than the one below.
Keep each ring round; the diagram shows every course.
209 pieces · Show in 3D
- 15
Lower half
Build the lower half of the sphere up from its bottom, course by course: each ring a little wider than the one below.
Keep each ring round; the diagram shows every course.
231 pieces · Show in 3D
- 16
Lower half
Build the lower half of the sphere up from its bottom, course by course: each ring a little wider than the one below.
Keep each ring round; the diagram shows every course.
241 pieces · Show in 3D
- 17
Lower half
Build the lower half of the sphere up from its bottom, course by course: each ring a little wider than the one below.
Keep each ring round; the diagram shows every course.
154 pieces · Show in 3D
- 18
Equator belt and walkway
Finish the lower half with the belt in dark orange: a ring with a lug over each column, and the equator walkway round the west side. Lay the long walkway plates first, then the rest.
Each walkway plate reaches back two studs onto the course below.
94 pieces · Show in 3D
- 19
Set the lower half
Lower the half sphere into the ring of columns until the lugs sit on all eight.
Guide it down level; the brackets' undersides take the column tops.
0 pieces · Show in 3D
Bag 04 · Stair tower116 pieces · steps 20 to 26
- 20
Tower columns
Stand four dark orange columns for the landings: the north pair to the first landing, the south pair to the second.
40 pieces · Show in 3D
- 21
First flight and landing
Set the first flight of stairs rising north, and lay the first landing on the north columns.
2 pieces · Show in 3D
- 22
Second flight and landing
Set the second flight rising south from the landing, and lay the second landing on the south columns.
2 pieces · Show in 3D
- 23
Upper columns
Carry the columns up from the landings: the north pair to the third landing, the south pair to the top.
52 pieces · Show in 3D
- 24
Third flight and landing
Set the third flight rising north, and lay the third landing.
2 pieces · Show in 3D
- 25
Last flight and top landing
Set the last flight rising south, lay the top landing, and bridge it across to the equator walkway.
The bridge ties the tower to the sphere.
3 pieces · Show in 3D
- 26
Equator walkway railing
Stand railing posts along the outer edge of the equator walkway, with a fluted patch panel here and there, and lay the rail on the posts.
Every piece of rail sits on at least one post.
15 pieces · Show in 3D
Bag 05 · Upper half285 pieces · steps 27 to 32
- 27
Upper half (part 1 of 6)
Build the upper half on the belt, each ring a little narrower than the one below.
Keep each ring round; the diagram shows every course.
48 pieces · Show in 3D
- 28
- 29
- 30
- 31
- 32
Bag 06 · Ramp and upper walkway102 pieces · steps 33 to 39
- 33
Ramp posts
Carry two of the columns on up past the belt, to hold the ramp where it passes over them.
The ramp's steps lie on these two posts.
7 pieces · Show in 3D
- 34
Ramp round the north side
From the north end of the equator walkway, step a spiral of dark orange plates round the north side of the sphere, one plate higher each step.
Each step sits on two or more studs of the one below; press it down over both.
6 pieces · Show in 3D
- 35
- 36
- 37
Upper walkway
Lay the next course of the sphere with the upper walkway in it: dark orange plates round the east side that start inside the ring and reach out past the sphere, over the top step of the ramp.
25 pieces · Show in 3D
- 38
- 39
Upper walkway railing
Stand the railing along the outer edge of the upper walkway.
Every piece of rail sits on at least one post.
12 pieces · Show in 3D
Bag 07 · Top of the sphere457 pieces · steps 40 to 54
- 40
Top of the sphere (part 1 of 6)
Carry the rings on up, each a little narrower.
Keep each ring round.
48 pieces · Show in 3D
- 41
Top of the sphere (part 2 of 6)
Carry on with the same step: the next 45 pieces.
45 pieces · Show in 3D
- 42
Top of the sphere (part 3 of 6)
Carry on with the same step: the next 32 pieces.
32 pieces · Show in 3D
- 43
Top of the sphere (part 4 of 6)
Carry on with the same step: the next 40 pieces.
40 pieces · Show in 3D
- 44
Top of the sphere (part 5 of 6)
Carry on with the same step: the next 40 pieces.
40 pieces · Show in 3D
- 45
Top of the sphere (part 6 of 6)
Carry on with the same step: the next 40 pieces.
40 pieces · Show in 3D
- 46
Top of the sphere (part 1 of 6)
Carry the rings on up, each a little narrower.
Keep each ring round.
34 pieces · Show in 3D
- 47
Top of the sphere (part 2 of 6)
Carry on with the same step: the next 32 pieces.
32 pieces · Show in 3D
- 48
Top of the sphere (part 3 of 6)
Carry on with the same step: the next 36 pieces.
36 pieces · Show in 3D
- 49
Top of the sphere (part 4 of 6)
Carry on with the same step: the next 32 pieces.
32 pieces · Show in 3D
- 50
Top of the sphere (part 5 of 6)
Carry on with the same step: the next 37 pieces.
37 pieces · Show in 3D
- 51
Top of the sphere (part 6 of 6)
Carry on with the same step: the next 28 pieces.
28 pieces · Show in 3D
- 52
Ramp to the top
From the south end of the upper walkway, step a second spiral round the south-east side of the sphere up to the top.
Each step sits on two or more studs of the one below; press it down over both.
6 pieces · Show in 3D
- 53
- 54
Bag 08 · Top deck264 pieces · steps 55 to 66
- 55
Lid
Close the top of the sphere: a big dark orange 16 x 16 plate across the middle, and reddish brown plates round it out to the edge of the last ring.
The big plate spans the hollow inside of the sphere.
10 pieces · Show in 3D
- 56
Deck (part 1 of 2)
Lay the deck: a ring of dark orange plates out past the edge of the sphere, round a reddish brown disc for the base of the cap.
The deck overhangs the sphere by a stud and a half all round.
32 pieces · Show in 3D
- 57
- 58
- 59
Deck railing (part 1 of 2)
Stand the railing round the deck's edge, leaving the gap where the ramp comes up, with patched panels in grey and nougat, and lay the rail.
Every piece of rail sits on at least one post.
31 pieces · Show in 3D
- 60
- 61
Ring walkway posts
Stand sixteen dark grey posts in a circle round the cap.
They stand on the cap's base, just outside its first ring.
16 pieces · Show in 3D
- 62
Ring walkway ramps
Build the two short ramps up to the ring walkway, east and west: four dark orange 2 x 3 plates each, stepping up a plate at a time towards the cap.
Each step sits on one row of studs of the one below.
8 pieces · Show in 3D
- 63
Ring walkway
Lay the ring walkway's first layer: a dark orange plate on every post, lying round the ring.
Each plate sits on a post; the second layer ties them together.
8 pieces · Show in 3D
- 64
- 65
Vents
Stand the two vents on top of the cap, inside the ring: a dark orange round brick and a cone each.
4 pieces · Show in 3D
- 66
Bag 09 · Silos180 pieces · steps 67 to 72
- 67
Silo 1
Build a silo: a dark orange round base, then three courses of four nougat quarter bricks, a dark orange band, three more courses, another band, three more and a dark orange roof.
Four quarter bricks make one round course; the bands tie the quarters together.
40 pieces · Show in 3D
- 68
Silo 1 roof and pipe
Stand the red, blue and white canisters on the roof, and run the pipe up the east side and over the edge of the roof.
20 pieces · Show in 3D
- 69
Silo 2
Build a silo: a dark orange round base, then three courses of four nougat quarter bricks, a dark orange band, three more courses, another band, three more and a dark orange roof.
Four quarter bricks make one round course; the bands tie the quarters together.
40 pieces · Show in 3D
- 70
Silo 2 roof and pipe
Stand the red, blue and white canisters on the roof, and run the pipe up the east side and over the edge of the roof.
20 pieces · Show in 3D
- 71
Silo 3
Build a silo: a dark orange round base, then three courses of four nougat quarter bricks, a dark orange band, three more courses, another band, three more and a dark orange roof.
Four quarter bricks make one round course; the bands tie the quarters together.
40 pieces · Show in 3D
- 72
Silo 3 roof and pipe
Stand the red, blue and white canisters on the roof, and run the pipe up the east side and over the edge of the roof.
20 pieces · Show in 3D
Bag 10 · Pipes and props61 pieces · steps 73 to 75
- 73
Pipe loop
Build the three pipe loops: two round columns each, a plate across the top, curved slopes to round the bends.
33 pieces · Show in 3D
- 74
Truck
Build the rusty truck under the sphere: wheels, a chassis, the cab and the flatbed.
8 pieces · Show in 3D
- 75
Barrels and pines
Stand the barrels round the pad and plant the pines round the lot.
20 pieces · Show in 3D
Bag 11 · Greenery33 pieces · steps 76 to 77
- 76
Bushes and pines
Plant the bushes on patches of soil round the pad and the lot, and the rest of the pines.
26 pieces · Show in 3D
- 77
Ivy
Lay the leaves over the walkway railings, hanging out past the edge.
Each leaf plate sits on the rail.
7 pieces · Show in 3D
// Every piece, counted
Parts list
3,045 pieces in 132 part and colour combinations for the whole model.
| Part | Number | Colour | Qty | |
|---|---|---|---|---|
| Plate 1 x 1 | 3024 | Reddish Brown | 279 | |
| Brick Round 2 x 2, Pin Holes | 17485 | Dark Orange | 269 | |
| Plate 1 x 2 | 3023 | Reddish Brown | 250 | |
| Plate 1 x 3 | 3623 | Reddish Brown | 212 | |
| Brick 1 x 1 | 3005 | Reddish Brown | 144 | |
| Plate 2 x 2 | 3022 | Reddish Brown | 141 | |
| Brick Round Corner 4 x 4 Macaroni Wide with 3 Studs | 48092 | Medium Nougat | 108 | |
| Brick 1 x 3 | 3622 | Reddish Brown | 88 | |
| Brick 1 x 2 | 3004 | Reddish Brown | 81 | |
| Brick 2 x 2 | 3003 | Reddish Brown | 80 | |
| Plate 1 x 4 | 3710 | Reddish Brown | 80 | |
| Brick Round 1 x 1 Open Stud | 3062b | Reddish Brown | 76 | |
| Plate 1 x 2 | 3023 | Dark Orange | 71 | |
| Plate 2 x 3 | 3021 | Reddish Brown | 61 | |
| Brick 1 x 4 | 3010 | Reddish Brown | 59 | |
| Plate 1 x 4 | 3710 | Dark Orange | 51 | |
| Plate 1 x 6 | 3666 | Reddish Brown | 40 | |
| Plate 2 x 3 | 3021 | Dark Orange | 35 | |
| Plate 2 x 4 | 3020 | Reddish Brown | 34 | |
| Plate Round 2 x 2 with Axle Hole Type 1 (+ Opening) | 4032a | Dark Orange | 34 | |
| Brick 2 x 4 | 3001 | Reddish Brown | 33 | |
| Brick Round 1 x 1 Open Stud | 3062b | Dark Orange | 33 | |
| Brick 2 x 4 | 3001 | Light Bluish Gray | 32 | |
| Plate 2 x 8 | 3034 | Reddish Brown | 31 | |
| Plate 1 x 10 | 4477 | Green | 28 | |
| Plate 2 x 4 | 3020 | Dark Orange | 26 | |
| Plate 1 x 1 | 3024 | Green | 26 | |
| Plate 1 x 1 | 3024 | Dark Orange | 25 | |
| Brick 2 x 3 | 3002 | Reddish Brown | 23 | |
| Plate 1 x 8 | 3460 | Reddish Brown | 22 | |
| Plate 1 x 12 | 60479 | Reddish Brown | 22 | |
| Plate 2 x 6 | 3795 | Reddish Brown | 18 | |
| Plate 2 x 2 | 3022 | Dark Orange | 17 | |
| Plate 1 x 2 | 3023 | Dark Bluish Gray | 17 | |
| Plate 1 x 12 | 60479 | Light Bluish Gray | 17 | |
| Plate 1 x 12 | 60479 | Dark Bluish Gray | 17 | |
| Plate 1 x 2 | 3023 | Yellow | 16 | |
| Brick Round 1 x 1 Open Stud | 3062b | Dark Bluish Gray | 16 | |
| Plate 1 x 4 | 3710 | Green | 15 | |
| Plate 1 x 1 | 3024 | Light Bluish Gray | 14 | |
| Plate 1 x 3 | 3623 | Dark Orange | 13 | |
| Plate 2 x 6 | 3795 | Dark Orange | 13 | |
| Plate 1 x 10 | 4477 | Reddish Brown | 13 | |
| Brick 2 x 10 | 3006 | Reddish Brown | 12 | |
| Plate Round Corners 8 x 8 x 2/3 Circle with Reduced Knobs | 66790 | Dark Orange | 12 | |
| Plate 16 x 16 | 91405 | Green | 12 | |
| Plant, Pine Tree - Small 2 x 2 x 4 | 2435 | Dark Green | 11 | |
| Plate 1 x 6 | 3666 | Green | 11 | |
| Plate 1 x 4 | 3710 | Light Bluish Gray | 11 | |
| Brick 1 x 6 | 3009 | Reddish Brown | 10 | |
| Plate 1 x 2 | 3023 | Green | 10 | |
| Plate 1 x 6 | 3666 | Light Bluish Gray | 10 | |
| Brick 2 x 6 | 2456 | Reddish Brown | 9 | |
| Plate 1 x 8 | 3460 | Light Bluish Gray | 9 | |
| Brick 1 x 8 | 3008 | Reddish Brown | 8 | |
| Plate 1 x 2 | 3023 | Light Bluish Gray | 8 | |
| Plate 4 x 4 | 3031 | Light Bluish Gray | 8 | |
| Plate 1 x 3 | 3623 | Green | 8 | |
| Plate 1 x 3 | 3623 | Light Bluish Gray | 8 | |
| Plate 2 x 10 | 3832 | Reddish Brown | 8 | |
| Plate 2 x 16 | 4282 | Dark Bluish Gray | 8 | |
| Brick 2 x 8 | 3007 | Reddish Brown | 7 | |
| Plate 1 x 8 | 3460 | Green | 7 | |
| Brick Curved 2 x 2 x 2/3 | 15068 | Dark Orange | 6 | |
| Plate 2 x 4 | 3020 | Light Bluish Gray | 6 | |
| Plate 1 x 1 | 3024 | Olive Green | 6 | |
| Brick Round 1 x 1 Open Stud | 3062b | Blue | 6 | |
| Plate 2 x 16 | 4282 | Green | 6 | |
| Plate Round 1 x 1 with Solid Stud | 6141 | Blue | 6 | |
| Plate Round 1 x 1 with Solid Stud | 6141 | Dark Orange | 6 | |
| Plate 8 x 16 | 92438 | Green | 6 | |
| Plate 2 x 12 | 2445 | Green | 5 | |
| Plate 4 x 8 | 3035 | Dark Orange | 5 | |
| Brick 1 x 12 | 6112 | Reddish Brown | 5 | |
| Plant, Leaves 4 x 3 | 2423 | Dark Green | 4 | |
| Stairs 7 x 4 x 6 Straight Open | 30134 | Dark Orange | 4 | |
| Plate 6 x 10 | 3033 | Light Bluish Gray | 4 | |
| Brick Round 1 x 1 Open Stud | 3062b | Red | 4 | |
| Plate 1 x 6 | 3666 | Dark Orange | 4 | |
| Plate 1 x 4 | 3710 | Dark Bluish Gray | 4 | |
| Plate 1 x 10 | 4477 | Dark Bluish Gray | 4 | |
| Plate 1 x 12 | 60479 | Dark Orange | 4 | |
| Plant, Bush 2 x 2 x 4 | 6064 | Green | 4 | |
| Plant, Bush 2 x 2 x 4 | 6064 | Dark Green | 4 | |
| Plate Round 1 x 1 with Solid Stud | 6141 | Black | 4 | |
| Plate Round 1 x 1 with Solid Stud | 6141 | Red | 4 | |
| Plant, Leaves 4 x 3 | 2423 | Green | 3 | |
| Brick 2 x 3 | 3002 | Olive Green | 3 | |
| Plate 2 x 8 | 3034 | Dark Orange | 3 | |
| Brick Round 1 x 1 Open Stud | 3062b | White | 3 | |
| Plate Round 1 x 1 with Solid Stud | 6141 | White | 3 | |
| Brick Special 1 x 2 with Grille | 2877 | Light Bluish Gray | 2 | |
| Brick Special 1 x 2 with Grille | 2877 | Medium Nougat | 2 | |
| Plate 2 x 3 | 3021 | Green | 2 | |
| Plate 2 x 2 | 3022 | Light Bluish Gray | 2 | |
| Plate 6 x 12 | 3028 | Green | 2 | |
| Plate 4 x 10 | 3030 | Light Bluish Gray | 2 | |
| Plate 1 x 8 | 3460 | Dark Bluish Gray | 2 | |
| Plate 1 x 6 | 3666 | Dark Bluish Gray | 2 | |
| Plate 2 x 6 | 3795 | Green | 2 | |
| Plate 2 x 16 | 4282 | Light Bluish Gray | 2 | |
| Brick Round 2 x 2 Truncated Cone | 98100 | Dark Orange | 2 | |
| Plate 2 x 12 | 2445 | Dark Bluish Gray | 1 | |
| Plate 2 x 12 | 2445 | Dark Orange | 1 | |
| Brick 2 x 2 | 3003 | Dark Red | 1 | |
| Plate 2 x 4 | 3020 | Green | 1 | |
| Plate 2 x 3 | 3021 | Light Bluish Gray | 1 | |
| Plate 2 x 3 | 3021 | Dark Bluish Gray | 1 | |
| Plate 2 x 2 | 3022 | Green | 1 | |
| Plate 6 x 16 | 3027 | Green | 1 | |
| Plate 6 x 12 | 3028 | Reddish Brown | 1 | |
| Plate 4 x 12 | 3029 | Green | 1 | |
| Plate 4 x 4 | 3031 | Green | 1 | |
| Plate 4 x 4 | 3031 | Reddish Brown | 1 | |
| Plate 4 x 6 | 3032 | Green | 1 | |
| Plate 6 x 10 | 3033 | Green | 1 | |
| Plate 6 x 10 | 3033 | Reddish Brown | 1 | |
| Plate 2 x 8 | 3034 | Green | 1 | |
| Plate 2 x 8 | 3034 | Light Bluish Gray | 1 | |
| Plate 2 x 8 | 3034 | Dark Bluish Gray | 1 | |
| Plate 4 x 8 | 3035 | Reddish Brown | 1 | |
| Plate 6 x 8 | 3036 | Green | 1 | |
| Plate 6 x 8 | 3036 | Reddish Brown | 1 | |
| Plate 1 x 8 | 3460 | Dark Orange | 1 | |
| Plate 2 x 6 | 3795 | Light Bluish Gray | 1 | |
| Plate 2 x 6 | 3795 | Dark Red | 1 | |
| Plate 6 x 6 | 3958 | Light Bluish Gray | 1 | |
| Plate 8 x 8 | 41539 | Light Bluish Gray | 1 | |
| Plate 8 x 8 | 41539 | Dark Bluish Gray | 1 | |
| Plate 1 x 10 | 4477 | Dark Orange | 1 | |
| Plate 16 x 16 | 91405 | Dark Orange | 1 | |
| Plate 8 x 16 | 92438 | Dark Bluish Gray | 1 |
Part and colour numbers follow the Rebrickable catalogue, and every part is made in the colour listed. The CSV has one line per part and colour: Part, Color, Quantity. Pick a bag above to see, copy or download just that bag.
// Techniques and display
Tips
A few techniques do the heavy lifting in this build. Worth a read before you start.
A sphere in rings
Each course of the sphere is a hollow ring two studs thick, packed with plates or bricks to follow the curve. On the way up the lower half, no ring is more than a stud wider than the one below, so every piece has studs to sit on.
Plates near the top and bottom keep the curve smooth where it turns fast; bricks round the middle save pieces.
The lower half
The lower half is 1,001 pieces, built on the table from the bottom up and lowered into the ring of columns in one go. The belt's lugs land on the column tops, and the upper half builds on from there.
Lower it straight down and level, with a hand under each side.
Walkways
Each walkway is part of a course of the sphere: long plates run from its outer edge two studs back over the course below, and the next course of the sphere clamps them down.
The spiral ramp
Each step is a plate lying on at least two studs of the one below. Two of the columns carry on up past the belt to hold the first ramp where it passes over them.
The ramp's last step tucks under the upper walkway, so the ramp goes on before that course.
Silos
Four quarter-round bricks make each round course of a silo. On their own they only stack, so the dark orange band every three courses is what ties the quarters together.
Handling and display
Lift it by the base, never by the sphere, the silos or the ramps.
A shelf for it needs about 55 × 50 cm and 40 cm of height.
// Questions
FAQ
The short answers, before you order a single brick.
Is this an official LEGO® set?
No. It's a free, fan-made design by PropBuilds. Every piece is a standard brick part, and the parts list gives the Rebrickable part and colour numbers so you can buy exactly the pieces you need.
How many pieces is it, and how big is it?
3,045 pieces in 11 bags and 77 steps. The finished model is about 20 × 18 in (51 × 45 cm) with its base, and 15 in (37 cm) tall.
Where do I get the parts?
Download the parts list as a CSV: one line per part and colour, with Rebrickable part and colour numbers and the quantity. You can import it into a parts list on Rebrickable and shop it from there, or look the numbers up on any brick parts marketplace. Every part is made in the colour listed.
How hard is it to build?
I'd call it advanced. Most of it is building rings course by course. The trickiest parts are lowering the lower half of the sphere onto its columns in one piece, and the spiral ramp, one plate at a time.
Has it been built in real bricks?
Not yet. Every piece is checked in software: it clutches studs or sits on a clip or a side stud, the build stays in one piece at every checkpoint, and every ramp step sits on at least two studs of the one below, and the first ramp also rests on two posts. I haven't built this one in real bricks yet.
Is PropBuilds affiliated with Facepunch or the LEGO Group?
No. This guide is fan-made and not affiliated with or endorsed by Facepunch Studios or the LEGO Group.
// Small print
Notes
What's checked
- Every piece clutches studs, and the build stays in one piece at every checkpoint. That is checked in software, piece by piece.
- Every ramp step sits on at least two studs of the one below.
- Every part is made in the colour listed, per the Rebrickable catalogue.
- I haven't built this one in real bricks yet.
Accuracy
- Layout, proportions and details are my reading of the monument from gameplay videos, not a survey.
- The thin diagonal braces between the columns and the spiral stairs round the silos are left out.
- The sphere is 32 studs (256 mm) across.
Fan-made
- A fan-made model inspired by a monument in Rust.
- Not affiliated with or endorsed by Facepunch Studios.
More for Rust
- Abandoned Supermarket brick build: the long hall, the fascia and the S PERM KET sign, bag by bag.
- The best video game LEGO sets: 18 boxed sets, from the Game Boy and PAC-MAN to Pokémon and Zelda, if you would rather build a set.
- Rust items in real life: official merch partners, replica props, tools and print files, in one guide.
- Rust player toolbox: one directory of the sites and tools worth having open on wipe day.
- Rust 3D print library: Rust STL files for the AK, Eoka, facemasks and more, each linked to its maker.
- PropBuilds DIY kits: my own Rust build kits: the Hackable Crate, the Shotgun Trap and the Minicopter.
PropBuilds brick guides are fan-made and not affiliated with or endorsed by Facepunch Studios.
LEGO® is a trademark of the LEGO Group, which does not sponsor, authorize or endorse this guide. Part names and numbers are used only to identify pieces.