// Free brick build guide · Rust monument
Large Oil Rig in bricks.
I rebuilt the Large Oil Rig monument in bricks: eight braced legs and the L1 walkway, the dock at the waterline, four storeys of rusty containers in a yellow steel frame, and a top deck with the lattice derrick, the helipad, two cranes that turn and the flare boom. Every piece is a standard brick part, and this page walks you through all of it, bag by bag.
- 4,275
- pieces
- 94
- steps
- 12
- bags
- 26 × 13 in
- footprint
- 19 in
- tall
- Advanced
- sideways and hinged techniques

// Before you start
Prepare
Thousands of pieces go into this one, so a little set-up now saves a lot of hunting later.
Get the parts
The parts list at the bottom of this page has every piece with its part number, colour and count. Filter it by bag, then copy it as CSV for whichever parts shop you use.
Part and colour numbers follow the Rebrickable catalogue, and every part is made in the colour listed.
Sort by bag
The build runs in 12 bags, from the jacket up to the flare boom. Tip each bag's pieces into its own tray before you start and every step goes quicker.
Each bag ends with the model in a state you can check against its picture below.
Clear a table
The finished rig is about 26 × 13 in (66 × 32 cm) with the flare boom and the helipad, and 19 in (49 cm) to the top of the derrick.
The two big decks are built flat on the table first. The L2 deck alone is 61 × 31 studs (49 × 25 cm), so give yourself room.
// The build, bag by bag
Bags
Jump straight to any bag. Each picture shows the rig at the end of that bag.
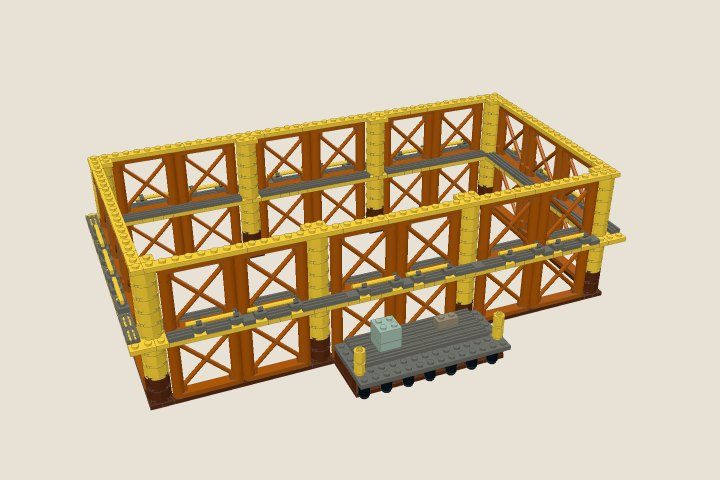
Jacket
The legs, the lattice bracing, the L1 walkway and the risers, up to the underside of L2.
504 pieces · steps 1 to 10Build this bag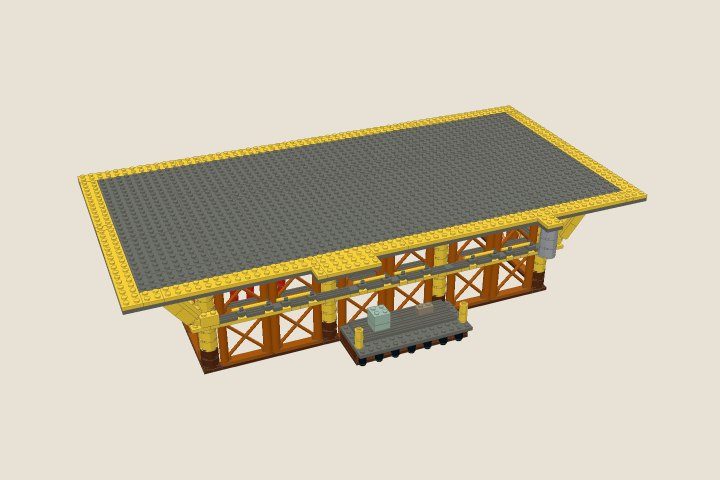
L2 deck
The bottom deck, built flat on the table and set on the jacket in one piece.
222 pieces · steps 11 to 17Build this bag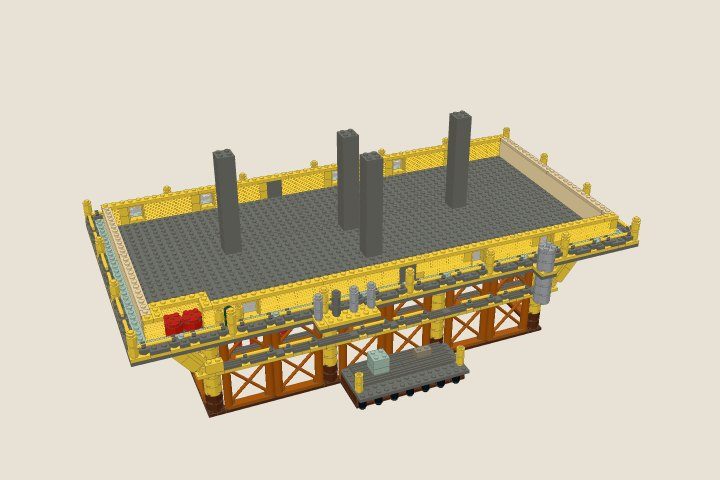
Level L2
The first storey of containers on the L2 deck, its frame and railing.
577 pieces · steps 18 to 27Build this bag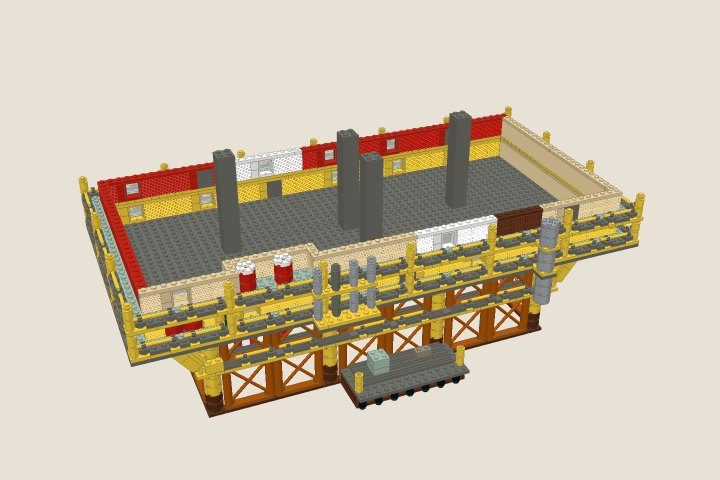
Level L3
The L3 floor ring, container walls, frame and railing.
630 pieces · steps 28 to 38Build this bag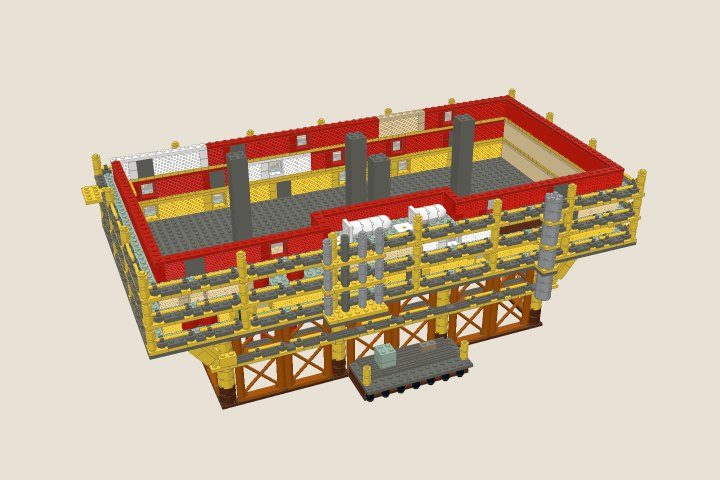
Level L4
The L4 floor ring, container walls, frame and railing.
649 pieces · steps 39 to 50Build this bag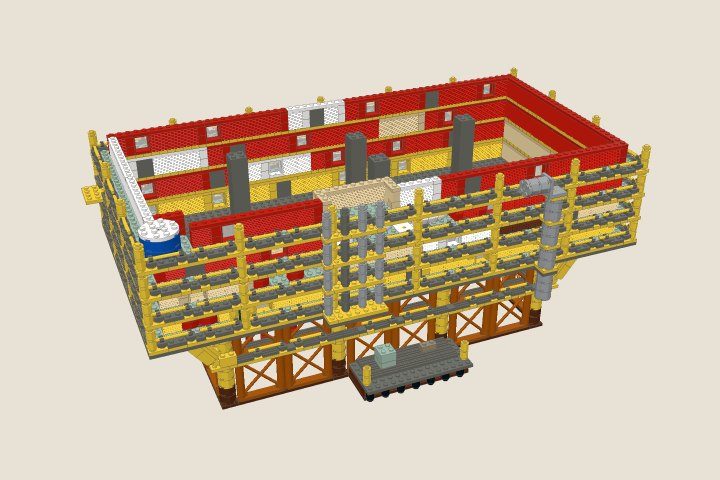
Level L5
The L5 floor ring, container walls, frame and railing.
634 pieces · steps 51 to 62Build this bag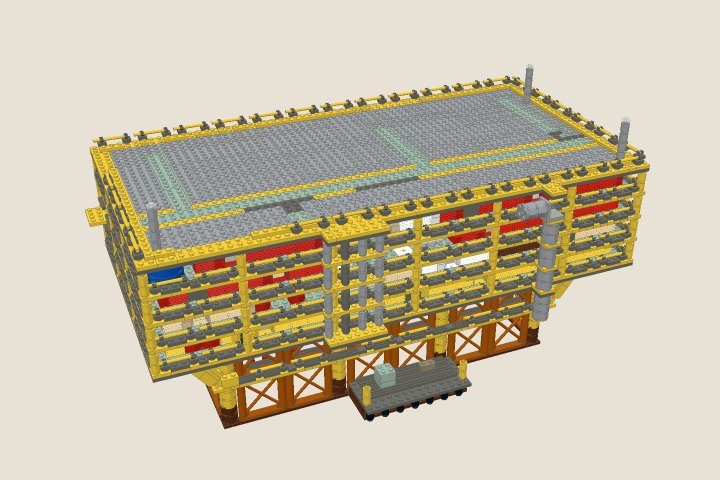
Top deck
The top deck, built flat and set on the L5 containers in one piece.
441 pieces · steps 63 to 69Build this bag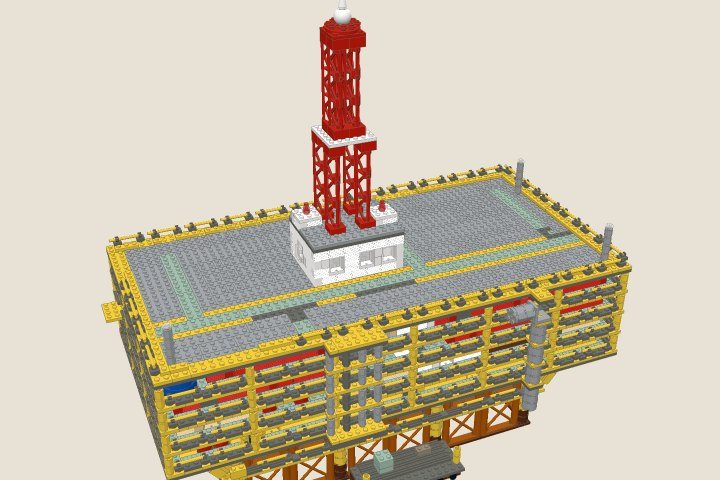
Drill floor and derrick
The white drill building, the derrick tower and the ball tank on top.
132 pieces · steps 70 to 75Build this bag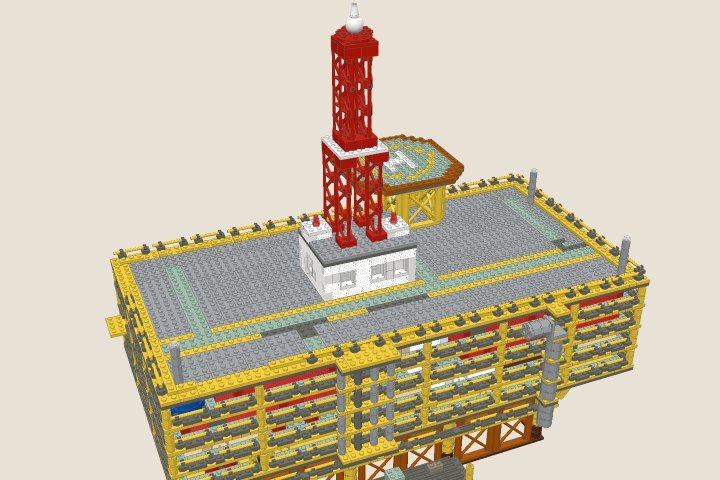
Helipad
The octagonal helipad on its columns, overhanging the north edge.
106 pieces · steps 76 to 78Build this bag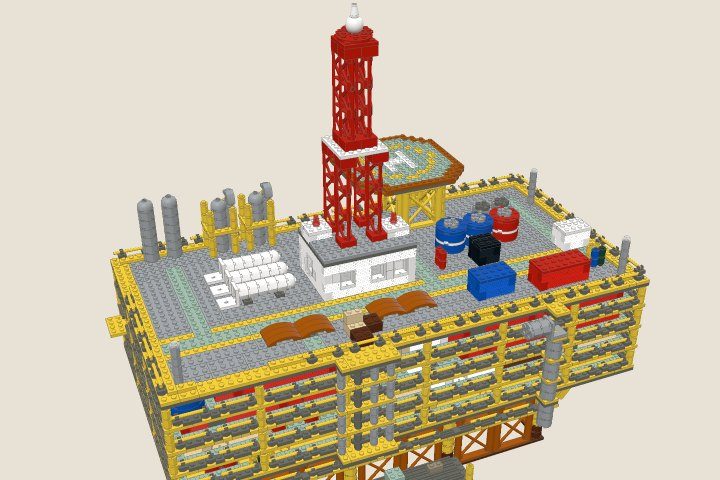
Process deck
Scrubbers, silos, tanks, containers and pipe stacks on the top deck.
250 pieces · steps 79 to 86Build this bag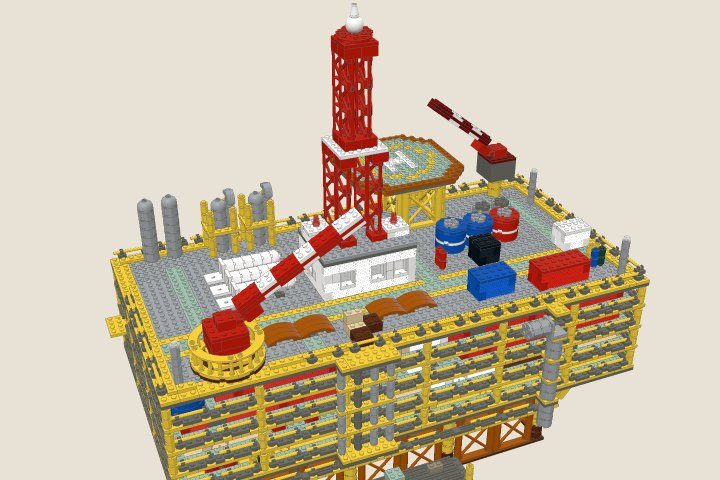
Cranes
The big pedestal crane at the south-west corner and the small crane at the north-east.
64 pieces · steps 87 to 91Build this bag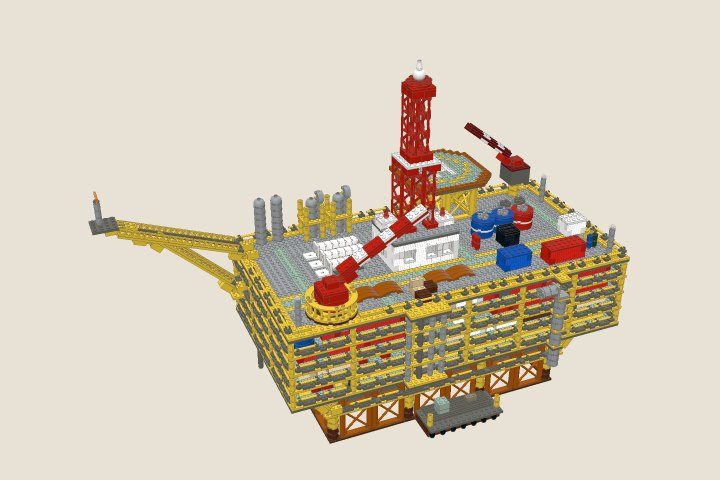
Flare boom
The lattice flare boom reaching out and up from the west end.
66 pieces · steps 92 to 94Build this bag// What you're building
The rig
Layout, proportions and colours come from studying the monument from every side. This is what's in the model.
Jacket
Eight round legs, rusty at the waterline, braced by dark orange lattice girders in two tiers with the L1 walkway ring between them. Risers hang down the north side, conductor pipes hang inside, and knee braces reach out to the deck overhangs.
Dock
Fluted sheet piling, a grating deck, tyre fenders, mooring posts, a generator and a crate, in front of the middle legs.
Four levels
Container walls in fluted bricks: mustard on L2, cream and rust on L3, red on L4 and L5, with windows and doorways. Thin handrails, green walkways, and tanks standing out on the walkways.
South face
The pipe bundle, clamped by every floor on its way up, and the big grey duct that turns out into its mouth at L5 and runs on below L2.
Derrick
Eight red lattice columns: four open legs on a 6 × 6 base, then four side by side, so the tall tower steps in the way the real one tapers. On top, the round red platform with rail posts and the white ball.
Helipad
A 16 stud octagon cut with wedge plates: sand green with the white H, the yellow circle and a rusty rim, on a yellow girder box and slim columns, hanging over the north edge.
Cranes
The big red crane turns on a locking turntable and its red and white boom rides on locking click hinges. The small crane at the north-east corner works the same way.
Flare boom
A lattice boom on click hinges, held at about 21 degrees by a strut from the L4 balcony, with a level platform, the flare stack and the flame at the tip.
Process deck
Scrubbers in yellow frames with looped exhausts, grey silos, white tanks lying on their brackets, pipe stacks, shipping containers, air handlers and barrels.
// Every step, in words
Every step
All 94 steps as a list, bag by bag. Open a bag to read its steps; "Show in 3D" jumps the viewer to that step.
Bag 01 · Jacket504 pieces · steps 1 to 10
- 1
Waterline frame
Lay the frame that ties the eight legs together at the waterline: reddish brown plates along both rows and across both ends, with a 2 x 2 pad for every leg.
Build it straight on the table. Everything else in the jacket stands on this frame.
20 pieces · Show in 3D
- 2
Legs and lower bracing
Stand the legs on their pads, two reddish brown 2 x 2 round bricks and then three yellow, and set the lower tier of dark orange lattice girders on the frame: two in every bay along the sides and three across each end.
The girders are the rig's X bracing. Line each one up with the frame's edge.
58 pieces · Show in 3D
- 3
Dock
Build the dock on the frame's apron in front of the middle legs: reddish brown fluted sheet piling one brick high, a plate deck with grating on top, black fenders hanging along the front, yellow mooring posts, a generator and a crate.
48 pieces · Show in 3D
- 4
L1 walkway (part 1 of 2)
Lay the L1 walkway on the girders: a yellow plate ring three studs wide that runs right over the leg tops, locking the legs and the lower bracing together.
The ring is what makes the jacket stiff. Press every plate down onto the girder studs.
47 pieces · Show in 3D
- 5
- 6
L1 grating (part 1 of 2)
Cover the walkway with dark grey grille tiles, leaving the girder lines and the leg circles bare: the upper tier stands on those studs.
53 pieces · Show in 3D
- 7
- 8
L1 handrail
Put the handrail round the outside of the L1 walkway: dark grey round plates and clip tiles for posts, with a yellow 4L bar in each pair of clips.
90 pieces · Show in 3D
- 9
Upper bracing
Carry the legs on up with five yellow round bricks each and stand the upper tier of girders on the walkway.
58 pieces · Show in 3D
- 10
Top of the jacket
Cap the girder lines and the legs with yellow plates, all at the same height, ready for the L2 deck.
30 pieces · Show in 3D
Bag 02 · L2 deck222 pieces · steps 11 to 17
- 11
L2 deck, lower layer
Off the model, lay the L2 deck's lower layer in dark grey, 61 by 31 studs with a shelf on the south edge, from the biggest plates you have.
Build it on a clean table. It goes onto the jacket in one piece.
26 pieces · Show in 3D
- 12
L2 deck, top layer
Lock the lower layer with a second one laid across its joints: yellow round the edge, dark grey inside.
44 pieces · Show in 3D
- 13
Set the L2 deck
Lower the deck onto the jacket so its edge overhangs the legs by eight studs at each end and four along each side. It lands on the leg tops and every cap plate.
Line up one corner leg first, then press the deck down all round.
0 pieces · Show in 3D
- 14
Risers and conductors (part 1 of 3)
Hang the risers under the north edge: dark grey 1 x 1 round bricks clicked on from below, with an orange band at the top, reaching down to the water. Inside the jacket, hang the red conductor pipes the same way, and hang the foot of the big grey duct under the south shelf.
Each column hangs from the deck on its studs, so add the bricks top first.
58 pieces · Show in 3D
- 15
Risers and conductors (part 2 of 3)
Carry on with the same step: the next 55 pieces.
55 pieces · Show in 3D
- 16
Risers and conductors (part 3 of 3)
Carry on with the same step: the next 11 pieces.
11 pieces · Show in 3D
- 17
Knee braces
Add the four knee braces under the deck overhangs: a hinge brick on the corner of the L1 ring beside each end leg, another hanging from the deck under a 1 x 2 brick, and between them a short yellow brace of plates on two more hinge bricks. Each one sits at about 53 degrees.
The brace only fits one way: it closes the triangle between the ring and the overhang.
28 pieces · Show in 3D
Bag 03 · Level L2577 pieces · steps 18 to 27
- 18
L2 container walls, south and west (part 1 of 2)
Build the L2 container walls on the south and west faces, two studs in from the edge: two courses of fluted 1 x 2 bricks in the colours shown, then a plate along the top. The flutes read as corrugated steel.
Stagger the joints between the two courses so each wall locks together.
48 pieces · Show in 3D
- 19
L2 container walls, south and west (part 2 of 2)
Carry on with the same step: the next 54 pieces.
54 pieces · Show in 3D
- 20
L2 container walls, north and east (part 1 of 2)
Build the L2 container walls on the north and east faces, two studs in from the edge: two courses of fluted 1 x 2 bricks in the colours shown, then a plate along the top. The flutes read as corrugated steel.
Stagger the joints between the two courses so each wall locks together.
49 pieces · Show in 3D
- 21
L2 container walls, north and east (part 2 of 2)
Carry on with the same step: the next 50 pieces.
50 pieces · Show in 3D
- 22
L2 frame and handrail, south and west
On the south and west faces, stand the yellow frame columns, one every ten studs, and run the handrail between them: a dark grey round plate and a clip tile for each post, and a yellow 4L bar snapped into each pair of clips.
117 pieces · Show in 3D
- 23
L2 frame and handrail, north and east
On the north and east faces, stand the yellow frame columns, one every ten studs, and run the handrail between them: a dark grey round plate and a clip tile for each post, and a yellow 4L bar snapped into each pair of clips.
117 pieces · Show in 3D
- 24
L2 walkway (part 1 of 2)
Plate the L2 walkway behind the handrail in sand green and the edge between the posts in dark grey, and carry the pipe bundle and the duct up the outside of the south face.
39 pieces · Show in 3D
- 25
- 26
L2 tanks
Stand the red tank and a row of yellow and dark green barrels on the south walkway.
10 pieces · Show in 3D
- 27
L2 core columns
Stand four dark grey columns inside the deck block. They carry the middle of the top deck later on.
44 pieces · Show in 3D
Bag 04 · Level L3630 pieces · steps 28 to 38
- 28
L3 floor ring (part 1 of 2)
Lay the L3 floor ring on the walls and columns below: yellow plates three studs wide all round, wider over the recessed bays.
Bridge the joints of the walls below so the whole level locks into one piece.
48 pieces · Show in 3D
- 29
- 30
L3 container walls, south and west (part 1 of 2)
Build the L3 container walls on the south and west faces, two studs in from the edge: two courses of fluted 1 x 2 bricks in the colours shown, then a plate along the top. The flutes read as corrugated steel.
Stagger the joints between the two courses so each wall locks together.
48 pieces · Show in 3D
- 31
L3 container walls, south and west (part 2 of 2)
Carry on with the same step: the next 56 pieces.
56 pieces · Show in 3D
- 32
L3 container walls, north and east (part 1 of 2)
Build the L3 container walls on the north and east faces, two studs in from the edge: two courses of fluted 1 x 2 bricks in the colours shown, then a plate along the top. The flutes read as corrugated steel.
Stagger the joints between the two courses so each wall locks together.
49 pieces · Show in 3D
- 33
L3 container walls, north and east (part 2 of 2)
Carry on with the same step: the next 53 pieces.
53 pieces · Show in 3D
- 34
L3 frame and handrail, south and west
On the south and west faces, stand the yellow frame columns, one every ten studs, and run the handrail between them: a dark grey round plate and a clip tile for each post, and a yellow 4L bar snapped into each pair of clips.
117 pieces · Show in 3D
- 35
L3 frame and handrail, north and east
On the north and east faces, stand the yellow frame columns, one every ten studs, and run the handrail between them: a dark grey round plate and a clip tile for each post, and a yellow 4L bar snapped into each pair of clips.
117 pieces · Show in 3D
- 36
L3 walkway (part 1 of 2)
Plate the L3 walkway behind the handrail in sand green and the edge between the posts in dark grey, and carry the pipe bundle and the duct up the outside of the south face.
40 pieces · Show in 3D
- 37
- 38
Bag 05 · Level L4649 pieces · steps 39 to 50
- 39
L4 floor ring (part 1 of 3)
Lay the L4 floor ring on the walls and columns below: yellow plates three studs wide all round, wider over the recessed bays.
Bridge the joints of the walls below so the whole level locks into one piece.
41 pieces · Show in 3D
- 40
- 41
- 42
L4 container walls, south and west (part 1 of 2)
Build the L4 container walls on the south and west faces, two studs in from the edge: two courses of fluted 1 x 2 bricks in the colours shown, then a plate along the top. The flutes read as corrugated steel.
Stagger the joints between the two courses so each wall locks together.
48 pieces · Show in 3D
- 43
L4 container walls, south and west (part 2 of 2)
Carry on with the same step: the next 54 pieces.
54 pieces · Show in 3D
- 44
L4 container walls, north and east (part 1 of 2)
Build the L4 container walls on the north and east faces, two studs in from the edge: two courses of fluted 1 x 2 bricks in the colours shown, then a plate along the top. The flutes read as corrugated steel.
Stagger the joints between the two courses so each wall locks together.
46 pieces · Show in 3D
- 45
L4 container walls, north and east (part 2 of 2)
Carry on with the same step: the next 52 pieces.
52 pieces · Show in 3D
- 46
L4 frame and handrail, south and west
On the south and west faces, stand the yellow frame columns, one every ten studs, and run the handrail between them: a dark grey round plate and a clip tile for each post, and a yellow 4L bar snapped into each pair of clips.
107 pieces · Show in 3D
- 47
L4 frame and handrail, north and east
On the north and east faces, stand the yellow frame columns, one every ten studs, and run the handrail between them: a dark grey round plate and a clip tile for each post, and a yellow 4L bar snapped into each pair of clips.
117 pieces · Show in 3D
- 48
L4 walkway (part 1 of 2)
Plate the L4 walkway behind the handrail in sand green and the edge between the posts in dark grey, and carry the pipe bundle and the duct up the outside of the south face.
42 pieces · Show in 3D
- 49
- 50
L4 tanks
Build the two long white tanks in the deep bay on the south walkway, the same way as the tanks on the top deck: a bracket with side studs and round bricks clicked on sideways.
11 pieces · Show in 3D
Bag 06 · Level L5634 pieces · steps 51 to 62
- 51
L5 floor ring (part 1 of 2)
Lay the L5 floor ring on the walls and columns below: yellow plates three studs wide all round, wider over the recessed bays.
Bridge the joints of the walls below so the whole level locks into one piece.
50 pieces · Show in 3D
- 52
- 53
L5 container walls, south and west (part 1 of 2)
Build the L5 container walls on the south and west faces, two studs in from the edge: two courses of fluted 1 x 2 bricks in the colours shown, then a plate along the top. The flutes read as corrugated steel.
Stagger the joints between the two courses so each wall locks together.
48 pieces · Show in 3D
- 54
L5 container walls, south and west (part 2 of 2)
Carry on with the same step: the next 58 pieces.
58 pieces · Show in 3D
- 55
L5 container walls, north and east (part 1 of 2)
Build the L5 container walls on the north and east faces, two studs in from the edge: two courses of fluted 1 x 2 bricks in the colours shown, then a plate along the top. The flutes read as corrugated steel.
Stagger the joints between the two courses so each wall locks together.
49 pieces · Show in 3D
- 56
L5 container walls, north and east (part 2 of 2)
Carry on with the same step: the next 51 pieces.
51 pieces · Show in 3D
- 57
L5 frame and handrail, south and west
On the south and west faces, stand the yellow frame columns, one every ten studs, and run the handrail between them: a dark grey round plate and a clip tile for each post, and a yellow 4L bar snapped into each pair of clips.
117 pieces · Show in 3D
- 58
L5 frame and handrail, north and east
On the north and east faces, stand the yellow frame columns, one every ten studs, and run the handrail between them: a dark grey round plate and a clip tile for each post, and a yellow 4L bar snapped into each pair of clips.
117 pieces · Show in 3D
- 59
L5 walkway (part 1 of 2)
Plate the L5 walkway behind the handrail in sand green and the edge between the posts in dark grey, and carry the pipe bundle and the duct up the outside of the south face.
40 pieces · Show in 3D
- 60
- 61
Duct mouth
Turn the top of the big duct west: a grey bracket on the L5 shelf with its studs facing west, two grey round bricks clicked on sideways and a round plate for the flared mouth.
4 pieces · Show in 3D
- 62
L5 tank
Stand the big blue tank in the bay at the west end of the south walkway.
3 pieces · Show in 3D
Bag 07 · Top deck441 pieces · steps 63 to 69
- 63
Top deck, lower layer
Off the model, lay the top deck's lower layer in dark grey: 61 by 31 studs, with small shelves on the south edge over the pipe bundle and the duct.
Build it on a clean table.
26 pieces · Show in 3D
- 64
Top deck, edge and footprints
Start the surface with plates: the yellow edge two studs wide, and a plate under every spot where equipment will stand. The rest of the deck gets its plates next.
Work from the diagram: the bare studs are the footprints for the next bags.
85 pieces · Show in 3D
- 65
Top deck, west half
Plate the west half: light grey, green walkways edged in yellow.
63 pieces · Show in 3D
- 66
- 67
Set the top deck
Lower the top deck onto the L5 containers, the core columns and the pipe bundle.
0 pieces · Show in 3D
- 68
Top deck railing, south and west
Run the handrail along the south and west edges, leaving gaps where the flare boom and the big crane's platform go, and lay yellow plates along the second row of the edge as a kick plate.
65 pieces · Show in 3D
- 69
Top deck railing, north and east
Run the handrail along the north and east edges.
126 pieces · Show in 3D
Bag 08 · Drill floor and derrick132 pieces · steps 70 to 75
- 70
Drill building (part 1 of 2)
Build the drill building: white fluted walls four bricks tall with windows set into the middle courses, then a dark grey roof.
The windows' glass clips in from behind before you set each frame.
59 pieces · Show in 3D
- 71
- 72
Drill floor
Plate the rest of the roof in light grey around the derrick's 4 x 4 footprint and two box footprints.
24 pieces · Show in 3D
- 73
Derrick tower, lower section
Stand four red lattice columns on the roof at the corners of a 6 x 6 square: the derrick's four legs, with open space between them.
Each leg is a 2 x 2 x 10 triangular girder. Check the spacing against the diagram before the plate goes on.
4 pieces · Show in 3D
- 74
Derrick tower, upper section
Tie the four legs together with a white 6 x 6 plate, then stand four more red columns side by side in its middle: the tower steps in from six studs to four.
The plate is what holds the legs square, so press it down onto all sixteen studs.
5 pieces · Show in 3D
- 75
Derrick crown
Cap the tower with a red 4 x 4 plate, then the round red platform with its rail posts and the white ball tank with its cap.
12 pieces · Show in 3D
Bag 09 · Helipad106 pieces · steps 76 to 78
- 76
Helipad support
Stand the pad's support: four yellow lattice girders in a pinwheel with a yellow ring on top, and four slim yellow columns outside the box.
33 pieces · Show in 3D
- 77
Helipad frame
Off the model, build the pad's frame: dark grey plates in a cross, and a 4 x 4 cut-corner wedge plate at each corner to give the octagon.
The pad overhangs the deck edge by five studs, so let the long plates run right across.
7 pieces · Show in 3D
- 78
Helipad surface
Plate the pad: a dark orange rim, sand green inside, a yellow circle and the white H. Then set the pad on its columns.
This top layer is what holds the frame plates together, so finish it before you lift the pad.
66 pieces · Show in 3D
Bag 10 · Process deck250 pieces · steps 79 to 86
- 79
Scrubbers (part 1 of 2)
Build the two scrubbers: yellow frames of 1 x 1 round posts with a ring half way up and at the top, each around a grey vessel and an exhaust pipe that loops over at the top: two 1 x 1 round columns joined by a curved 1 x 2 brick.
50 pieces · Show in 3D
- 80
- 81
- 82
Horizontal tanks
Build the three white tanks west of the drill building. A 2 x 2 bracket stands with its studs facing east; click five 2 x 2 round bricks onto them sideways, finish with a dome, and let the tank rest on two saddles.
Push each round brick firmly home: the whole tank hangs off the bracket's four studs.
27 pieces · Show in 3D
- 83
Round tanks
Stand the two blue tanks and the red one: two 4 x 4 round bricks each with a white band between and a lid.
15 pieces · Show in 3D
- 84
Containers
Build the shipping containers: a big red one, a blue one, a black one and a white one.
56 pieces · Show in 3D
- 85
Deck clutter
Scatter the small stuff: crates, two air handlers with fan tops, and barrels.
22 pieces · Show in 3D
- 86
Pipe stacks
Lay the two stacks of rusty pipes: three rows of curved 4 x 1 bricks, end to end.
12 pieces · Show in 3D
Bag 11 · Cranes64 pieces · steps 87 to 91
- 87
Big crane pedestal
Stand the yellow pedestal, then the rusty 8 x 8 round platform with its curved yellow railing.
6 pieces · Show in 3D
- 88
Big crane cab
Set the turntable on the platform, build the red cab on it and put two click hinges on its roof, facing east.
The turntable lets the whole cab swing round.
28 pieces · Show in 3D
- 89
Big crane boom
Build the boom on the other halves of the hinges: red and white plates, a red spine, plates on top. Click it on and set it about 30 degrees up.
The locking hinges hold the angle.
0 pieces · Show in 3D
- 90
Small crane
Build the small crane: a yellow round pedestal, a 2 x 2 turntable, a dark grey cab and two hinges facing west.
30 pieces · Show in 3D
- 91
Small crane boom
Build the dark red and white boom and click it on, pointing west over the helipad.
0 pieces · Show in 3D
Bag 12 · Flare boom66 pieces · steps 92 to 94
- 92
Flare boom
Build the flare boom off the model: a yellow deck four studs wide on two click hinges, lattice fence sides and grating between. Click it onto the hinges on the west edge and set it about 21 degrees up.
Support the boom while you set the angle; the two locking hinges then hold it.
41 pieces · Show in 3D
- 93
Flare tip
At the tip, click on the flare platform with its own pair of hinges and set it level: a dark grey plate, a grey flare stack and the flame on top.
The tip hinges let the platform sit flat whatever angle the boom is at.
8 pieces · Show in 3D
- 94
Flare boom strut
Build the strut: a 2 x 17 yellow deck with lattice fence sides, a hinge brick under each end. Click the lower end onto the hinges on the L4 west balcony and the upper end into the hinges under the boom. It sits at about 44 degrees and locks the boom into a rigid triangle.
Set the boom's angle first; the strut only fits when the boom is at about 21 degrees.
17 pieces · Show in 3D
// Every piece, counted
Parts list
4,275 pieces in 214 part and colour combinations for the whole model.
| Part | Number | Colour | Qty | |
|---|---|---|---|---|
| Plate Round 1 x 1 with Solid Stud | 6141 | Dark Bluish Gray | 386 | |
| Tile Special 1 x 1 with Clip with Rounded Edges | 15712 | Dark Bluish Gray | 382 | |
| Brick Special 1 x 2 with Grille | 2877 | Red | 291 | |
| Brick Round 1 x 1 Open Stud | 3062b | Yellow | 208 | |
| Bar 4L (Lightsaber Blade / Wand) | 30374 | Yellow | 191 | |
| Plate 1 x 3 | 3623 | Yellow | 164 | |
| Plate 1 x 2 | 3023 | Yellow | 153 | |
| Plate 1 x 2 | 3023 | Dark Bluish Gray | 153 | |
| Tile Special 1 x 2 Grille with Bottom Groove | 2412b | Dark Bluish Gray | 130 | |
| Brick Special 1 x 2 with Grille | 2877 | White | 128 | |
| Brick Special 1 x 2 with Grille | 2877 | Tan | 128 | |
| Plate Round 1 x 1 with Solid Stud | 6141 | Yellow | 100 | |
| Brick Special 1 x 2 with Grille | 2877 | Yellow | 88 | |
| Plate 1 x 1 | 3024 | Dark Bluish Gray | 74 | |
| Brick Round 1 x 1 Open Stud | 3062b | Dark Bluish Gray | 68 | |
| Brick Round 2 x 2 with Axle Hole | 3941 | Yellow | 66 | |
| Brick Round 1 x 1 Open Stud | 3062b | Red | 59 | |
| Brick Round 1 x 1 Open Stud | 3062b | Light Bluish Gray | 59 | |
| Plate 1 x 10 | 4477 | Sand Green | 56 | |
| Brick 1 x 1 | 3005 | Red | 50 | |
| Plate 1 x 4 | 3710 | Yellow | 45 | |
| Plate 1 x 12 | 60479 | Yellow | 45 | |
| Brick 2 x 2 | 3003 | Dark Bluish Gray | 40 | |
| Support 1 x 6 x 5 Girder Rectangular | 64448 | Dark Orange | 36 | |
| Plate 2 x 3 | 3021 | Yellow | 35 | |
| Brick Round 2 x 2 with Axle Hole | 3941 | Light Bluish Gray | 33 | |
| Plate 1 x 2 | 3023 | Light Bluish Gray | 31 | |
| Plate 1 x 1 | 3024 | Yellow | 31 | |
| Glass for Window 1 x 2 x 2 Flat | 60601 | Trans-Clear | 31 | |
| Brick 1 x 2 | 3004 | Dark Bluish Gray | 28 | |
| Plate 1 x 1 | 3024 | Light Bluish Gray | 26 | |
| Plate 2 x 16 | 4282 | Yellow | 24 | |
| Plate 1 x 12 | 60479 | Red | 23 | |
| Brick 1 x 1 | 3005 | White | 22 | |
| Brick 1 x 1 | 3005 | Yellow | 20 | |
| Brick Round 2 x 2 with Axle Hole | 3941 | White | 20 | |
| Plate Round 1 x 1 with Solid Stud | 6141 | Light Bluish Gray | 20 | |
| Plate 1 x 12 | 60479 | Dark Bluish Gray | 19 | |
| Tile 1 x 1 with Groove | 3070b | Dark Bluish Gray | 18 | |
| Plate 1 x 8 | 3460 | Sand Green | 18 | |
| Fence Lattice 1 x 4 x 1 | 3633 | Yellow | 18 | |
| Plate 1 x 4 | 3710 | Light Bluish Gray | 17 | |
| Brick Special 1 x 2 with Grille | 2877 | Reddish Brown | 16 | |
| Brick 1 x 1 | 3005 | Tan | 16 | |
| Plate 2 x 2 | 3022 | Yellow | 16 | |
| Hinge Brick 1 x 2 Locking with 1 Finger Vertical End | 30364 | Yellow | 16 | |
| Hinge Brick 1 x 2 Locking with 2 Fingers Vertical End, 9 Teeth | 30365 | Yellow | 16 | |
| Brick Round 2 x 2 with Axle Hole | 3941 | Reddish Brown | 16 | |
| Plate 2 x 4 | 3020 | Light Bluish Gray | 14 | |
| Window 1 x 2 x 2 Flat Front | 60592 | Red | 14 | |
| Plate 8 x 16 | 92438 | Dark Bluish Gray | 14 | |
| Plate 2 x 12 | 2445 | Yellow | 13 | |
| Plate 1 x 8 | 3460 | Yellow | 13 | |
| Brick Special 1 x 2 with Grille | 2877 | Blue | 12 | |
| Brick Curved 4 x 1 Double with No Studs | 93273 | Dark Orange | 12 | |
| Plate 2 x 3 | 3021 | Light Bluish Gray | 11 | |
| Plate 2 x 2 | 3022 | Light Bluish Gray | 11 | |
| Plate 1 x 2 | 3023 | Sand Green | 11 | |
| Plate 1 x 3 | 3623 | Light Bluish Gray | 11 | |
| Plate 1 x 6 | 3666 | Light Bluish Gray | 11 | |
| Plate 1 x 12 | 60479 | Light Bluish Gray | 11 | |
| Plate 1 x 2 | 3023 | Dark Orange | 10 | |
| Plate 2 x 2 | 3022 | White | 9 | |
| Plate 1 x 8 | 3460 | Light Bluish Gray | 9 | |
| Window 1 x 2 x 2 Flat Front | 60592 | White | 9 | |
| Brick Special 1 x 2 with Grille | 2877 | Black | 8 | |
| Plate 2 x 2 | 3022 | Dark Bluish Gray | 8 | |
| Plate 1 x 3 | 3623 | Dark Bluish Gray | 8 | |
| Plate 1 x 6 | 3666 | Yellow | 8 | |
| Plate 1 x 4 | 3710 | Sand Green | 8 | |
| Plate Round 1 x 1 with Solid Stud | 6141 | Red | 8 | |
| Plate 16 x 16 | 91405 | Dark Bluish Gray | 8 | |
| Support 2 x 2 x 10 Girder Triangular Vertical - Type 4 - 3 Posts, 3 Sections | 95347 | Red | 8 | |
| Plate 2 x 4 | 3020 | Yellow | 7 | |
| Plate 1 x 2 | 3023 | Reddish Brown | 7 | |
| Plate 1 x 1 | 3024 | Red | 7 | |
| Plate 1 x 1 | 3024 | Sand Green | 7 | |
| Plate 6 x 16 | 3027 | Dark Bluish Gray | 7 | |
| Brick Round 1 x 1 Open Stud | 3062b | Black | 7 | |
| Plate 2 x 10 | 3832 | Sand Green | 7 | |
| Plate Round 2 x 2 with Axle Hole Type 1 (+ Opening) | 4032a | Light Bluish Gray | 7 | |
| Plate 1 x 12 | 60479 | Tan | 7 | |
| Window 1 x 2 x 2 Flat Front | 60592 | Yellow | 7 | |
| Plate 2 x 3 | 3021 | Red | 6 | |
| Plate 2 x 2 | 3022 | Sand Green | 6 | |
| Brick Round 1 x 1 Open Stud | 3062b | Orange | 6 | |
| Brick Round 2 x 2 with Axle Hole | 3941 | Red | 6 | |
| Plate 1 x 12 | 60479 | Reddish Brown | 6 | |
| Brick Round 4 x 4 Centre Hole | 87081 | Blue | 6 | |
| Plate 1 x 1 | 3024 | Tan | 5 | |
| Brick Round 2 x 2 Dome Top, Hollow Stud | 30367c | White | 5 | |
| Plate 6 x 14 | 3456 | Dark Bluish Gray | 5 | |
| Plate 2 x 10 | 3832 | Yellow | 5 | |
| Bracket 2 x 2 - 2 x 2 | 3956 | White | 5 | |
| Plate 1 x 10 | 4477 | Light Bluish Gray | 5 | |
| Brick 2 x 2 | 3003 | Light Bluish Gray | 4 | |
| Brick 1 x 2 | 3004 | Yellow | 4 | |
| Fence Spindled 4 x 4 x 2 Quarter Round with 2 Studs | 30056 | Yellow | 4 | |
| Plate 2 x 3 | 3021 | White | 4 | |
| Plate 2 x 3 | 3021 | Sand Green | 4 | |
| Plate 2 x 2 | 3022 | Dark Red | 4 | |
| Plate 1 x 2 | 3023 | Red | 4 | |
| Plate 4 x 4 | 3031 | Dark Bluish Gray | 4 | |
| Plate 4 x 6 | 3032 | Yellow | 4 | |
| Plate 2 x 8 | 3034 | Light Bluish Gray | 4 | |
| Hinge Brick 1 x 2 Locking with 1 Finger Vertical End | 30364 | Red | 4 | |
| Hinge Brick 1 x 2 Locking with 2 Fingers Vertical End, 9 Teeth | 30365 | Red | 4 | |
| Brick Round 2 x 2 Dome Top, Hollow Stud | 30367c | Light Bluish Gray | 4 | |
| Wedge Plate 4 x 4 Cut Corner | 30503 | Dark Orange | 4 | |
| Brick Round 1 x 1 Open Stud | 3062b | Dark Green | 4 | |
| Brick 1 x 3 | 3622 | Dark Bluish Gray | 4 | |
| Plate 1 x 3 | 3623 | Red | 4 | |
| Plate 1 x 3 | 3623 | Sand Green | 4 | |
| Plate 1 x 10 | 4477 | Yellow | 4 | |
| Plate Round 4 x 4 with Pin Hole | 60474 | White | 4 | |
| Support 1 x 6 x 5 Girder Rectangular | 64448 | Yellow | 4 | |
| Plate 2 x 12 | 2445 | Light Bluish Gray | 3 | |
| Brick 1 x 4 | 3010 | Red | 3 | |
| Plate 2 x 4 | 3020 | Sand Green | 3 | |
| Plate 1 x 2 | 3023 | Tan | 3 | |
| Plate 1 x 1 | 3024 | White | 3 | |
| Plate 4 x 12 | 3029 | Light Bluish Gray | 3 | |
| Plate 4 x 10 | 3030 | Light Bluish Gray | 3 | |
| Plate 1 x 8 | 3460 | Dark Bluish Gray | 3 | |
| Plate 1 x 6 | 3666 | Red | 3 | |
| Plate 1 x 6 | 3666 | Dark Bluish Gray | 3 | |
| Plate 2 x 6 | 3795 | Light Bluish Gray | 3 | |
| Plate 2 x 6 | 3795 | Dark Bluish Gray | 3 | |
| Plate 2 x 6 | 3795 | Sand Green | 3 | |
| Plate 2 x 16 | 4282 | Dark Bluish Gray | 3 | |
| Plate 1 x 10 | 4477 | Reddish Brown | 3 | |
| Plate 1 x 10 | 4477 | Dark Orange | 3 | |
| Plate Round 1 x 1 with Solid Stud | 6141 | Trans-Clear | 3 | |
| Brick 2 x 2 | 3003 | Reddish Brown | 2 | |
| Brick 2 x 2 | 3003 | Sand Green | 2 | |
| Brick 1 x 1 | 3005 | Reddish Brown | 2 | |
| Brick 1 x 4 | 3010 | Dark Bluish Gray | 2 | |
| Plate 2 x 3 | 3021 | Dark Red | 2 | |
| Plate 1 x 1 | 3024 | Dark Orange | 2 | |
| Plate 4 x 12 | 3029 | Yellow | 2 | |
| Plate 4 x 12 | 3029 | Dark Bluish Gray | 2 | |
| Plate 4 x 4 | 3031 | Red | 2 | |
| Plate 2 x 8 | 3034 | Sand Green | 2 | |
| Plate 4 x 8 | 3035 | Dark Bluish Gray | 2 | |
| Brick Round 1 x 1 Open Stud | 3062b | Blue | 2 | |
| Plate 1 x 8 | 3460 | White | 2 | |
| Plate 1 x 8 | 3460 | Tan | 2 | |
| Brick 1 x 3 | 3622 | Red | 2 | |
| Plate 1 x 3 | 3623 | White | 2 | |
| Plate 1 x 6 | 3666 | White | 2 | |
| Plate 1 x 6 | 3666 | Reddish Brown | 2 | |
| Plate 1 x 6 | 3666 | Sand Green | 2 | |
| Plate 1 x 4 | 3710 | Red | 2 | |
| Plate 1 x 4 | 3710 | White | 2 | |
| Plate 2 x 10 | 3832 | Light Bluish Gray | 2 | |
| Plate Round 2 x 2 with Axle Hole Type 1 (+ Opening) | 4032a | Red | 2 | |
| Plate Round 2 x 2 with Axle Hole Type 1 (+ Opening) | 4032a | White | 2 | |
| Plate Round 2 x 2 with Axle Hole Type 1 (+ Opening) | 4032a | Dark Bluish Gray | 2 | |
| Plate 1 x 10 | 4477 | Red | 2 | |
| Plate 1 x 10 | 4477 | White | 2 | |
| Plate 1 x 10 | 4477 | Tan | 2 | |
| Cone 1 x 1 [No Top Groove] | 4589 | Trans-Red | 2 | |
| Plate Round 4 x 4 with Pin Hole | 60474 | Blue | 2 | |
| Plate Round 4 x 4 with Pin Hole | 60474 | Red | 2 | |
| Plate 1 x 12 | 60479 | White | 2 | |
| Brick Curved 1 x 2 x 1 1/3 with Curved Top | 6091 | Light Bluish Gray | 2 | |
| Brick Round 4 x 4 Centre Hole | 87081 | Red | 2 | |
| Brick Round 2 x 2 Sphere with Stud [Plain] | 20953 | White | 1 | |
| Plate 2 x 12 | 2445 | Dark Bluish Gray | 1 | |
| Brick 2 x 2 | 3003 | Tan | 1 | |
| Brick 1 x 2 | 3004 | Red | 1 | |
| Brick 1 x 2 | 3004 | Tan | 1 | |
| Brick 1 x 2 | 3004 | Dark Tan | 1 | |
| Plate 2 x 4 | 3020 | Blue | 1 | |
| Plate 2 x 4 | 3020 | White | 1 | |
| Plate 2 x 3 | 3021 | Black | 1 | |
| Plate 2 x 3 | 3021 | Dark Bluish Gray | 1 | |
| Plate 2 x 2 | 3022 | Reddish Brown | 1 | |
| Plate 1 x 2 | 3023 | Dark Red | 1 | |
| Plate 6 x 16 | 3027 | Yellow | 1 | |
| Plate 6 x 12 | 3028 | Reddish Brown | 1 | |
| Plate 6 x 12 | 3028 | Dark Bluish Gray | 1 | |
| Plate 4 x 4 | 3031 | Light Bluish Gray | 1 | |
| Plate 4 x 4 | 3031 | Dark Red | 1 | |
| Plate 2 x 8 | 3034 | Yellow | 1 | |
| Plate 4 x 8 | 3035 | Yellow | 1 | |
| Plate 4 x 8 | 3035 | Light Bluish Gray | 1 | |
| Turntable 4 x 4 Top, Locking | 30658 | Red | 1 | |
| Plate 1 x 8 | 3460 | Dark Orange | 1 | |
| Plate 1 x 3 | 3623 | Black | 1 | |
| Plate 1 x 3 | 3623 | Blue | 1 | |
| Plate 1 x 3 | 3623 | Tan | 1 | |
| Plate 1 x 6 | 3666 | Tan | 1 | |
| Turntable 2 x 2 Plate - Top | 3679 | Light Bluish Gray | 1 | |
| Turntable 2 x 2 Plate, Base | 3680 | Yellow | 1 | |
| Plate 1 x 4 | 3710 | Blue | 1 | |
| Plate 1 x 4 | 3710 | Dark Bluish Gray | 1 | |
| Plate 2 x 6 | 3795 | Red | 1 | |
| Plate 2 x 6 | 3795 | Reddish Brown | 1 | |
| Plate 2 x 10 | 3832 | Dark Bluish Gray | 1 | |
| Plate 2 x 10 | 3832 | Dark Red | 1 | |
| Bracket 2 x 2 - 2 x 2 | 3956 | Light Bluish Gray | 1 | |
| Plate 6 x 6 | 3958 | White | 1 | |
| Plate 6 x 6 | 3958 | Light Bluish Gray | 1 | |
| Plate 8 x 8 | 41539 | Dark Bluish Gray | 1 | |
| Plate 2 x 16 | 4282 | Red | 1 | |
| Plate 1 x 10 | 4477 | Dark Bluish Gray | 1 | |
| Cone 1 x 1 [No Top Groove] | 4589 | White | 1 | |
| Window 1 x 2 x 2 Flat Front | 60592 | Tan | 1 | |
| Turntable 4 x 4 Square Base, Locking | 61485 | Yellow | 1 | |
| Flame / Headwear Accessory Plume / Feather, Triple Point | 64647 | Trans-Orange | 1 | |
| Plate Round 8 x 8 | 74611 | Reddish Brown | 1 | |
| Plate Round 1 x 1 with Open Stud | 85861 | Dark Bluish Gray | 1 | |
| Brick Round 4 x 4 Centre Hole | 87081 | Yellow | 1 |
Part and colour numbers follow the Rebrickable catalogue, and every part is made in the colour listed. The CSV has one line per part and colour: Part, Color, Quantity. Pick a bag above to see, copy or download just that bag.
// Techniques and display
Tips
A few techniques do the heavy lifting in this build, and the finished rig has some delicate parts. Worth a read before you start.
Sideways tanks
The white tanks, the long tanks on L4 and the duct mouth lie on their sides. Each starts with a 2 × 2 bracket whose studs face sideways; round bricks click onto those studs one after another, and a dome or round plate closes the end.
Push each round brick firmly home: the whole tank hangs off four studs.
Locking hinges
The crane booms, the flare boom, its strut and the four knee braces ride on locking click hinges, which hold whatever angle you set.
The strut and the knee braces close a triangle, so each fits at one angle only: a click hinge's axis sits half a stud past the end of its brick, which makes every brace a whole number of studs between its hinges. Set the flare boom first, then click the strut in.
Built flat, set in place
The L2 deck, the top deck and the helipad are built flat on the table and lowered onto the model in one piece.
Line up one corner first, then press down all round.
Turntables
Both crane cabs turn: the big crane on a 4 × 4 locking turntable, the small crane on a 2 × 2 turntable.
Handrails
Every handrail is a 4L bar snapped into two clip tiles on short posts. Line the bar up with both clips before you press.
Handling and display
Lift the finished rig by the jacket or the L2 deck, never by the derrick, the cranes or the flare boom.
It stands on its own legs on any flat surface. A shelf for it needs about 70 × 35 cm and 50 cm of height.
// Questions
FAQ
The short answers, before you order a single brick.
Is this an official LEGO® set?
No. It's a free, fan-made design by PropBuilds. Every piece is a standard brick part, and the parts list gives the Rebrickable part and colour numbers so you can buy exactly the pieces you need.
How many pieces is it, and how big is it?
4,275 pieces in 12 bags and 94 steps. The finished model is about 26 × 13 in (67 × 32 cm) with the flare boom and the helipad, and 19 in (49 cm) tall.
Where do I get the parts?
Download the parts list as a CSV: one line per part and colour, with Rebrickable part and colour numbers and the quantity. You can import it into a parts list on Rebrickable and shop it from there, or look the numbers up on any brick parts marketplace. Every part is made in the colour listed.
How hard is it to build?
I'd call it advanced. Most of it is decks and container walls built level by level. The trickiest parts are lowering the big decks onto the model in one piece, the tanks that hang on sideways studs, and clicking the flare boom and its strut into the one angle where they fit.
Has it been built in real bricks?
Not yet. Every piece is checked in software: it clutches studs or sits on a clip or a side stud, the build stays in one piece at every checkpoint, and every hinged brace and the flare strut are a whole number of studs between their hinges, so each locks at one angle. I haven't built this one in real bricks yet.
Is PropBuilds affiliated with Facepunch or the LEGO Group?
No. This guide is fan-made and not affiliated with or endorsed by Facepunch Studios or the LEGO Group.
// Small print
Notes
What's checked
- Every piece clutches studs or sits on a hinge, clip, bracket or turntable, and the build stays in one piece at every checkpoint. That is checked in software, piece by piece.
- Every part is made in the colour listed, per the Rebrickable catalogue.
- I haven't built this one in real bricks yet. The hinged braces and the flare strut are sized so their hinges line up exactly, but they haven't been test-fitted.
Accuracy
- Layout and details are my reading of the monument from screenshots, not a survey.
- The deck is 61 × 31 studs (488 × 248 mm).
Fan-made
- A fan-made model inspired by a monument in Rust.
- Not affiliated with or endorsed by Facepunch Studios.
More for Rust
- Sphere Tank brick build: the rusty sphere on its eight columns, the ramps and the silos, bag by bag.
- Abandoned Supermarket brick build: the long hall, the fascia and the S PERM KET sign, bag by bag.
- The best video game LEGO sets: 18 boxed sets, from the Game Boy and PAC-MAN to Pokémon and Zelda, if you would rather build a set.
- Rust items in real life: official merch partners, replica props, tools and print files, in one guide.
- Rust player toolbox: one directory of the sites and tools worth having open on wipe day.
- PropBuilds DIY kits: my own Rust build kits: the Hackable Crate, the Shotgun Trap and the Minicopter.
PropBuilds brick guides are fan-made and not affiliated with or endorsed by Facepunch Studios.
LEGO® is a trademark of the LEGO Group, which does not sponsor, authorize or endorse this guide. Part names and numbers are used only to identify pieces.