// Free brick build guide · Rust monument
Abandoned Supermarket in bricks.
I rebuilt the Abandoned Supermarket monument in bricks: the long hall on its concrete lot, corrugated cream walls over a tall green base, the rust red fascia with its dark green louvers, the tall shop windows with the pegboard shelving and the checkout behind them, the back block and the recycler yard, and the broken sign on the roof that now spells S PERM KET. Every piece is a standard brick part, and this page walks you through all of it, bag by bag.
- 2,542
- pieces
- 72
- steps
- 11
- bags
- 22 × 18 in
- footprint
- 7 in
- tall
- Intermediate
- one sideways sign

// Before you start
Prepare
A little set-up before you start saves a lot of hunting later.
Get the parts
The parts list at the bottom of this page has every piece with its part number, colour and count. Filter it by bag, then copy it as CSV for whichever parts shop you use.
Part and colour numbers follow the Rebrickable catalogue, and every part is made in the colour listed.
Sort by bag
The build runs in 11 bags, from the lot and the shop inside, up through the walls and the roof, to the sign and the props round the lot. Tip each bag's pieces into its own tray before you start and every step goes quicker.
Each bag ends with the store in a state you can check against its picture below.
Clear a table
The finished store is about 22 × 18 in (56 × 46 cm) with its lot, and 7 in (19 cm) tall to the top of the sign.
The lot and the roof are built flat on the table, and the roof alone is 60 × 36 studs (48 × 29 cm).
// The build, bag by bag
Bags
Jump straight to any bag. Each picture shows the store at the end of that bag.
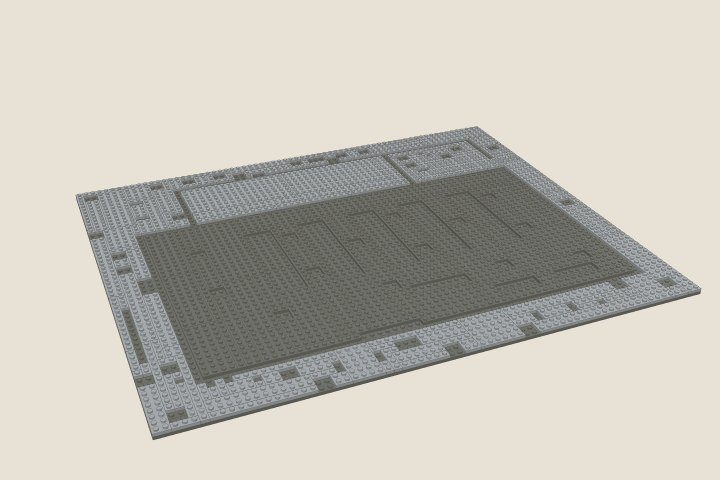
Base
The concrete lot the whole store stands on, and the shop floor.
259 pieces · steps 1 to 5Build this bag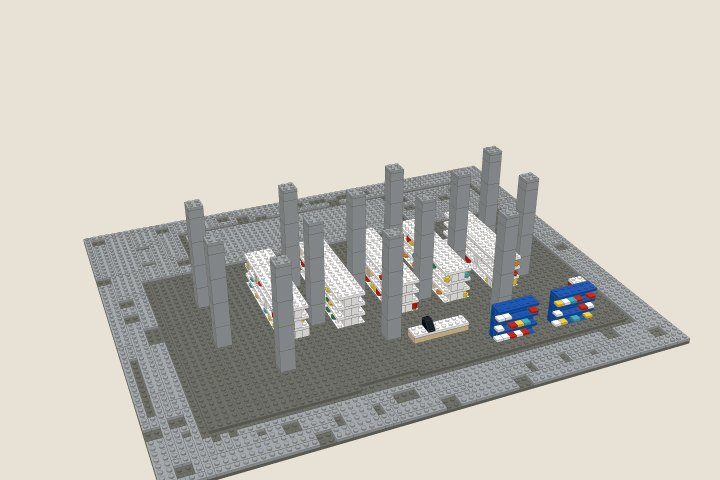
Shop
Inside the store: the white pegboard shelving, the blue news racks, the red cooler, the checkout counter and the grey columns that carry the roof.
383 pieces · steps 6 to 15Build this bag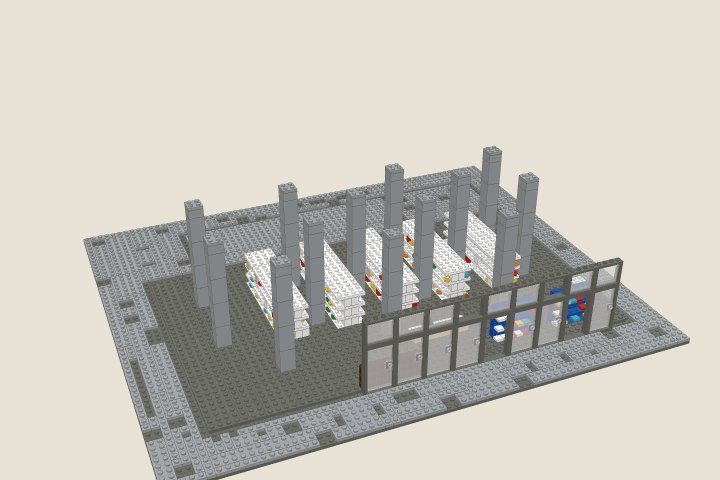
Storefront
The glass front: nine tall dark bays with transom windows, some panes smashed, two bays boarded up.
38 pieces · steps 16 to 18Build this bag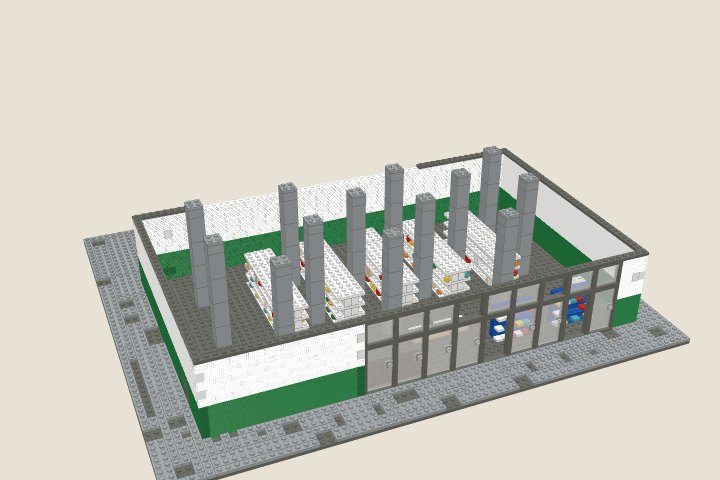
Walls
The hall's walls: a tall green base and cream corrugated walls above it.
711 pieces · steps 19 to 37Build this bag
Back block
The block behind the hall: the same green and cream walls, a rust red band at the top, a dark doorway and a round vent.
302 pieces · steps 38 to 44Build this bag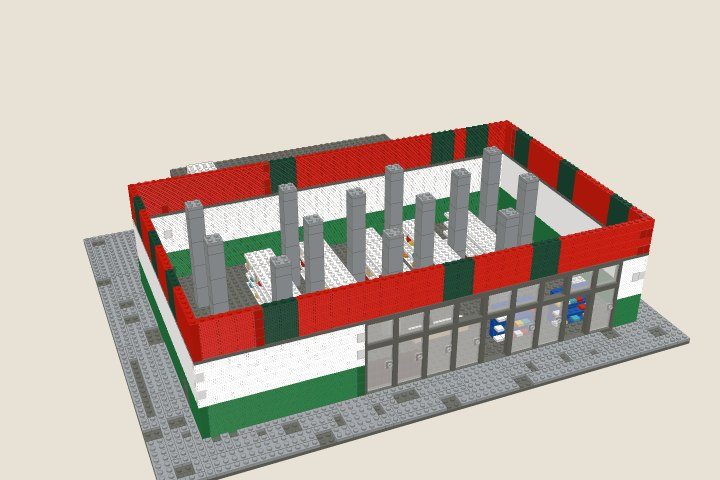
Fascia
The tall rust red band round the top of the hall and its dark green louvers.
385 pieces · steps 45 to 52Build this bag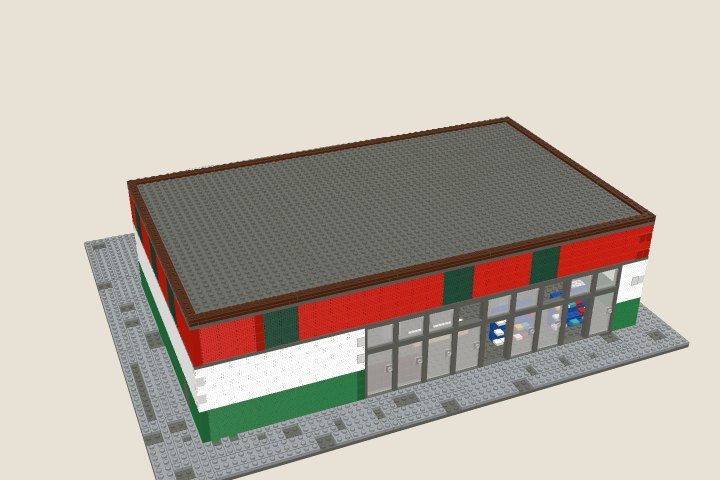
Roof
The hall roof, built flat and set on the fascia and the columns in one piece.
79 pieces · steps 53 to 56Build this bag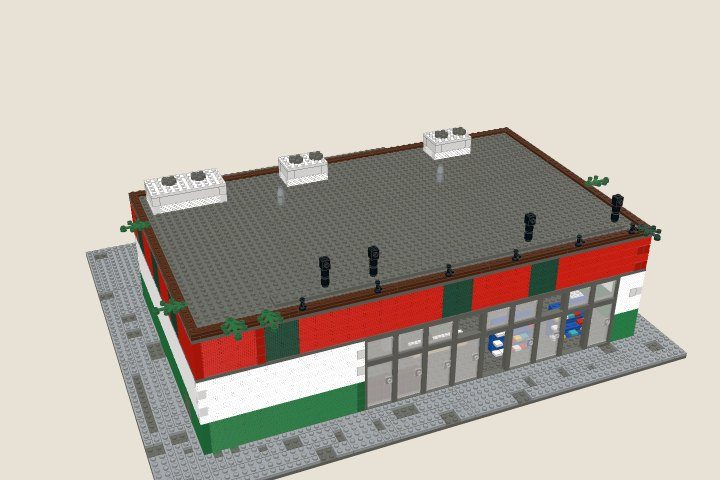
Roof gear
The rooftop units along the back edge, the vent pipes, the sign beam and posts, the lamps and the ivy.
83 pieces · steps 57 to 59Build this bag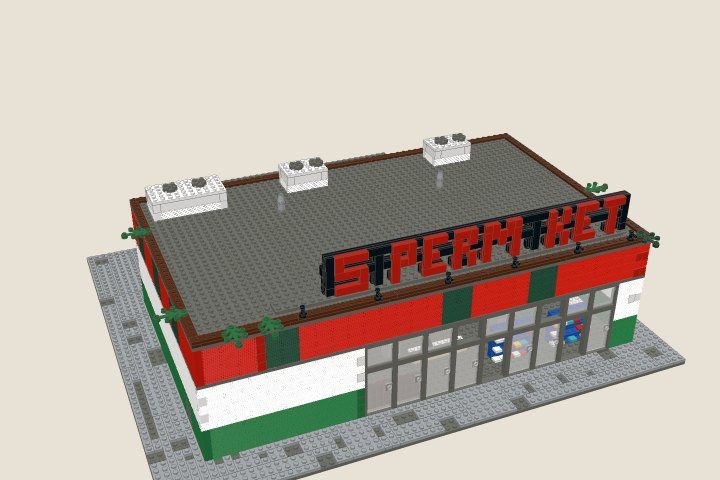
Sign
The broken sign: red letters on a black frame, built flat and stood up on the beam.
155 pieces · steps 60 to 63Build this bag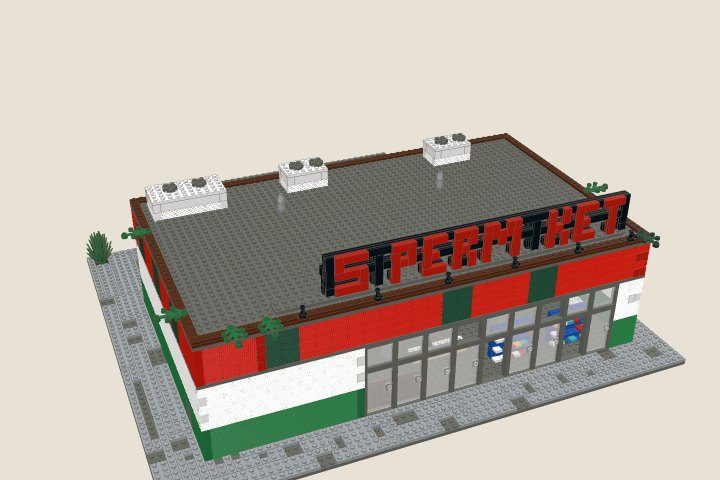
Back lot
The yellow ladder up the back wall, the recycler yard, and the clutter behind the store: crates, pallets, tyres, barrels and a car under a tarp.
85 pieces · steps 64 to 69Build this bag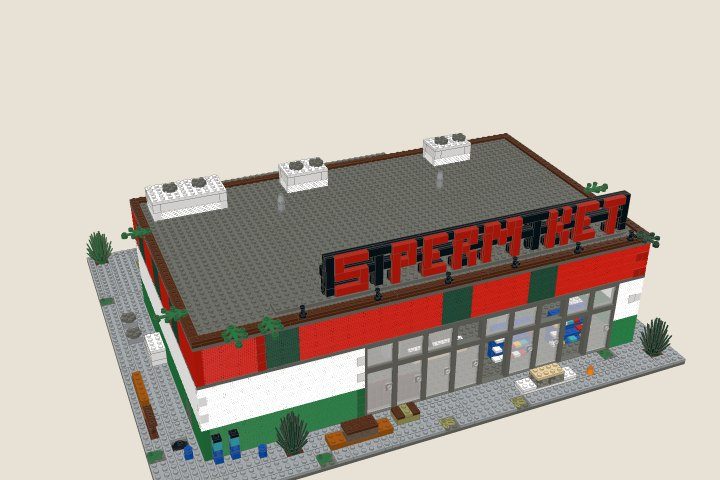
Street
Out front and by the west wall: the payphones, AC units and cabinet, the rusty sheets, the barrels, the military crate, the two old cars, the bushes and the weeds.
62 pieces · steps 70 to 72Build this bag// What you're building
The store
Layout, proportions and colours come from studying the monument's screenshots from every side, top-down included. This is what's in the model.
Hall
A long hall, 60 × 36 studs, on a concrete lot: four courses of green at the base and five of cream above, in fluted bricks that read as the corrugated metal walls.
Storefront
Nine tall shop windows in dark grey frames, each with a transom above. Four panes are smashed out and the two west bays are boarded up from inside.
Inside
Five white shelving runs with pegboard backs and a few goods left on the shelves, two blue news racks by the glass, a red drinks cooler and the checkout counter, all on a dark floor.
Fascia and sign
Four courses of rust red corrugated fascia with dark green louvers. On the roof, S PERM KET in red on a black frame, standing on a dark beam with gooseneck lamps along the edge.
Roof
Dark grey with a reddish brown parapet, three white units with dark fans along the back edge, vent pipes, and ivy spilling over the edge.
Back block
The lower block behind the hall, its roof level with the bottom of the fascia, with a rust red band, a dark doorway and a round vent.
Recycler yard
A rusty lattice fence round the recycler, a yellow bin, gas bottles, oil barrels and a loot crate.
Round the back
A yellow ladder up the back wall to the roof, wooden loot crates with blue straps, pallets, tyres, rubbish bags, a green electrical box and a car under a green tarp.
Out front
Two blue payphones, AC units, a long white cabinet and rusty sheets by the west wall; a rusty car and a white one, a military crate, a cone, bushes and weeds in the cracks.
// Every step, in words
Every step
All 72 steps as a list, bag by bag. Open a bag to read its steps; "Show in 3D" jumps the viewer to that step.
Bag 01 · Base259 pieces · steps 1 to 5
- 1
Lot
Lay the lot in dark grey plates: 70 by 58 studs, the hall and the back block included.
Build it straight on the table. It is one layer for now; the second layer locks it together next.
24 pieces · Show in 3D
- 2
Floors (part 1 of 4)
Cover the lot with a second layer of plates, light grey outside and dark grey for the shop floor, leaving the wall lines and the spots where the shelves, columns and props stand bare.
The second layer crosses the first one's joints, so the lot is now one piece.
59 pieces · Show in 3D
- 3
- 4
- 5
Bag 02 · Shop383 pieces · steps 6 to 15
- 6
Shelving (part 1 of 6)
Build the five white shelving runs going back from the storefront: a white plate for the bottom shelf, two rows of white Technic bricks for the pegboard back, a shelf plate, and so on up to the top. Stand the goods on the shelves as you go.
The holes in the Technic bricks are the pegboard. Most shelves have been picked almost clean.
49 pieces · Show in 3D
- 7
- 8
- 9
- 10
- 11
- 12
News racks
Build the two blue news racks by the glass the same way, one-sided: blue plates for the shelves, a row of blue Technic bricks behind, and magazines on the shelves.
38 pieces · Show in 3D
- 13
Cooler and counter
Build the red drinks cooler in the corner and the checkout counter by the glass: a tan base, a white top and the black register.
7 pieces · Show in 3D
- 14
Columns (part 1 of 2)
Stand the thirteen grey columns that will carry the middle of the roof: four 2 x 2 x 3 bricks, a 2 x 2 brick and a 2 x 2 plate each.
They come up exactly level with the top of the fascia.
52 pieces · Show in 3D
- 15
Bag 03 · Storefront38 pieces · steps 16 to 18
- 16
Boards
Stand the reddish brown log bricks just inside the two west bays: the boards nailed up behind the glass.
They stand on the lot, one stud in from the front wall.
6 pieces · Show in 3D
- 17
Storefront frames
Stand a dark grey 1 x 4 x 6 frame in each of the nine bays along the front, and a 1 x 4 x 3 window frame on top of each: the tall shop windows and their transoms.
Keep the bays tight together; the trim plate ties their tops later.
18 pieces · Show in 3D
- 18
Glass
Clip the clear glass into the frames: tall panels below, small panes in the transoms. Four are smashed out; leave those empty.
Look at the diagram for which panes stay empty.
14 pieces · Show in 3D
Bag 04 · Walls711 pieces · steps 19 to 37
- 19
Green base (part 1 of 8)
Build four courses of green fluted bricks round the hall wherever there is no glass, with a dark doorway near the front of the west wall. In the second course, just west of where the back block will go, use a green brick with a stud on its side, stud facing out: the ladder clicks onto it later.
The flutes read as the corrugated metal panels on the real walls. Stagger the joints from course to course.
39 pieces · Show in 3D
- 20
- 21
- 22
- 23
- 24
- 25
- 26
- 27
Cream walls (part 1 of 10)
Add five courses of cream fluted bricks on top, with another side-stud brick for the ladder in the third.
38 pieces · Show in 3D
- 28
- 29
- 30
- 31
- 32
- 33
- 34
- 35
- 36
- 37
Trim
Run a dark grey plate round the top of the walls and across the storefront frames, except along the back where the back block will stand: its roof finishes that stretch.
The plate ties the storefront frames together, so press it down across every joint.
19 pieces · Show in 3D
Bag 05 · Back block302 pieces · steps 38 to 44
- 38
Back block walls (part 1 of 4)
Build the back block's walls: four courses of green and four of cream, lining up with the hall's, with a dark doorway in the middle of the back wall and a side-stud brick for the vent high up.
The side stud faces out, away from the hall.
58 pieces · Show in 3D
- 39
Back block walls (part 2 of 4)
Carry on with the same step: the next 58 pieces.
58 pieces · Show in 3D
- 40
Back block walls (part 3 of 4)
Carry on with the same step: the next 58 pieces.
58 pieces · Show in 3D
- 41
Back block walls (part 4 of 4)
Carry on with the same step: the next 59 pieces.
59 pieces · Show in 3D
- 42
Red band
Add one course of red fluted bricks round the top of the back block.
It comes up level with the hall's trim plate.
29 pieces · Show in 3D
- 43
Back block roof
Roof the block in dark grey: first 2 x 12 plates running from just inside the back wall right onto the hall's wall, a row of plates along the back wall, then a second layer across them. Stand the white rooftop unit at the west end.
The 2 x 12 plates finish the hall's trim along the back, so the two buildings lock together and every edge of the roof sits on a wall.
39 pieces · Show in 3D
- 44
Round vent
Click the black dish onto the side stud high on the back wall: the round vent.
1 pieces · Show in 3D
Bag 06 · Fascia385 pieces · steps 45 to 52
- 45
Fascia (part 1 of 8)
Build four courses of red fluted bricks round the top of the hall. The dark green panels are the louvers: three on each side. The first course gets the last side-stud brick for the ladder.
Stagger the joints from course to course so the band locks together.
49 pieces · Show in 3D
- 46
- 47
- 48
- 49
- 50
- 51
- 52
Bag 07 · Roof79 pieces · steps 53 to 56
- 53
Roof, lower layer
Off the model, lay the roof's lower layer in dark grey, 60 by 36 studs.
Build it on the table.
16 pieces · Show in 3D
- 54
Roof, surface
Lay the roof's second layer: a reddish brown edge and dark grey plates everywhere else, crossing the first layer's joints.
47 pieces · Show in 3D
- 55
- 56
Set the roof
Lower the roof onto the hall. It lands on the fascia all round and on the thirteen columns inside.
Line up one corner first, then press it down along every wall and over the columns.
0 pieces · Show in 3D
Bag 08 · Roof gear83 pieces · steps 57 to 59
- 57
Rooftop units
Build the three white units along the back of the roof, each with two dark round fans on top: the big one at the west end and two smaller ones further along. Fluted white bricks make the vents.
55 pieces · Show in 3D
- 58
Sign beam and posts
Lay the dark grey beam along the front of the roof, then stand the four posts on it: two round bricks and a brick whose side stud faces the street.
Turn every side stud to face the street.
16 pieces · Show in 3D
- 59
Lamps and ivy
Stand the black gooseneck lamps on the parapet, leaning out over the fascia, and clip the ivy on where it spills over the edge.
12 pieces · Show in 3D
Bag 09 · Sign155 pieces · steps 60 to 63
- 60
Sign frame
Off the model, lay the sign's frame flat in black: the top and middle rails, the four uprights between them, and short spacers where the letters' bottom row goes. Then double every part of it with a second layer whose joints fall in different places.
The rails are 43 studs long; the offset joints are what hold them straight.
54 pieces · Show in 3D
- 61
Letters
Build the letters in red plates on the frame, and tile the frame between them in black.
Every stroke that isn't on a rail or a spacer runs up or down onto one, so use the plate lengths the diagram shows.
65 pieces · Show in 3D
- 62
Letter faces
Tile the letters' faces in red.
The U, the A and the second R are long gone. Leave the gaps: that is what the sign says now.
36 pieces · Show in 3D
- 63
Stand the sign up
Stand the sign up, letters to the street, and click its middle rail onto the four side studs.
Start at one end and work along; each post lines up with an upright.
0 pieces · Show in 3D
Bag 10 · Back lot85 pieces · steps 64 to 69
- 64
Ladder
Off the model, build the yellow ladder flat: two columns of yellow plates, their joints staggered, then sixteen yellow grille tiles across them for the rungs.
The staggered joints are what keep the ladder straight once the tiles are on.
21 pieces · Show in 3D
- 65
Hang the ladder
Stand the ladder against the back wall of the hall, rungs out, and click it onto the three side studs.
It runs from the lot to the top of the parapet.
0 pieces · Show in 3D
- 66
Yard fence
Stand the reddish brown lattice fence round the recycler yard, two panels high, leaving the gap at the south-east as the gate.
Each upper panel sits straight on the one below.
12 pieces · Show in 3D
- 67
Recycler
Build the recycler in the yard: a light grey box with a round dark door on its front.
The door is a dish on a brick with a side stud, like the vent.
6 pieces · Show in 3D
- 68
Crates, pallets and barrels
Build the loot round the back: the big wooden crates with their blue straps, the small crates, the pallet stack, the oil barrels, the yellow bin and the gas bottles in the yard, the tyres, the green electrical box and the rubbish bags.
39 pieces · Show in 3D
- 69
Car under a tarp
Build the car under its green tarp in the back corner: a 2 x 8 plate on four round plates, and two curved bricks back to back for the tarp.
7 pieces · Show in 3D
Bag 11 · Street62 pieces · steps 70 to 72
- 70
By the west wall
Build the two blue payphones at the corner, the grey AC units, the long white cabinet, the rusty corrugated sheets and fence panel, a rubbish bag and a blue barrel.
Each payphone is a blue brick, a blue headlight brick with its hollow facing the street, a light blue brick for the lit sign and a black plate on top.
23 pieces · Show in 3D
- 71
Out front
Build the olive military crate with its wooden ends, the rusty car, the white car and the cone.
Both cars face west, along the storefront.
25 pieces · Show in 3D
- 72
Greenery
Plant the bushes against the front wall and at the corner of the lot, and the weeds in the cracks.
14 pieces · Show in 3D
// Every piece, counted
Parts list
2,542 pieces in 178 part and colour combinations for the whole model.
| Part | Number | Colour | Qty | |
|---|---|---|---|---|
| Brick Special 1 x 2 with Grille | 2877 | White | 527 | |
| Brick Special 1 x 2 with Grille | 2877 | Green | 409 | |
| Brick Special 1 x 2 with Grille | 2877 | Red | 300 | |
| Brick Special 1 x 2 with Grille | 2877 | Dark Green | 96 | |
| Brick 2 x 2 x 3 | 30145 | Light Bluish Gray | 52 | |
| Technic Brick 1 x 8 [7 Pin Holes] | 3702 | White | 45 | |
| Plate 1 x 12 | 60479 | Dark Bluish Gray | 33 | |
| Technic Brick 1 x 4 [3 Pin Holes] | 3701 | White | 30 | |
| Plate 1 x 12 | 60479 | Reddish Brown | 27 | |
| Plate 2 x 12 | 2445 | Dark Bluish Gray | 24 | |
| Plate 2 x 2 | 3022 | Light Bluish Gray | 21 | |
| Plate 1 x 1 | 3024 | Black | 20 | |
| Plate 4 x 12 | 3029 | White | 20 | |
| Plate 4 x 4 | 3031 | White | 20 | |
| Brick Round 1 x 1 Open Stud | 3062b | Trans-Clear | 20 | |
| Plate 16 x 16 | 91405 | Dark Bluish Gray | 20 | |
| Brick 1 x 1 | 3005 | White | 19 | |
| Tile 1 x 1 with Groove | 3070b | Black | 18 | |
| Brick 1 x 1 | 3005 | Red | 17 | |
| Plate 1 x 12 | 60479 | Light Bluish Gray | 17 | |
| Plate Round 1 x 1 with Solid Stud | 6141 | Red | 17 | |
| Tile Special 1 x 2 Grille with Bottom Groove | 2412b | Yellow | 16 | |
| Brick 2 x 2 | 3003 | Light Bluish Gray | 16 | |
| Plate 1 x 3 | 3623 | Light Bluish Gray | 16 | |
| Plate Round 1 x 1 with Solid Stud | 6141 | Green | 16 | |
| Plate Round 1 x 1 with Solid Stud | 6141 | Yellow | 16 | |
| Plate 1 x 1 | 3024 | Light Bluish Gray | 15 | |
| Plate 4 x 12 | 3029 | Dark Bluish Gray | 15 | |
| Brick Round 1 x 1 Open Stud | 3062b | Red | 15 | |
| Tile 1 x 1 with Groove | 3070b | Red | 15 | |
| Plate Round 1 x 1 with Solid Stud | 6141 | Medium Azure | 15 | |
| Plate 1 x 4 | 3710 | Dark Bluish Gray | 14 | |
| Plate 2 x 16 | 4282 | Dark Bluish Gray | 14 | |
| Plate 8 x 16 | 92438 | Dark Bluish Gray | 14 | |
| Plate 1 x 2 | 3023 | Red | 13 | |
| Tile 1 x 2 with Groove | 3069b | Red | 13 | |
| Fence 1 x 4 x 2 Ornamental Asian Lattice Square with 4 Studs | 32932 | Reddish Brown | 13 | |
| Brick Round 1 x 1 Open Stud | 3062b | Yellow | 12 | |
| Plate 1 x 4 | 3710 | Light Bluish Gray | 12 | |
| Plate Round 1 x 1 with Solid Stud | 6141 | Black | 12 | |
| Brick 1 x 1 | 3005 | Tan | 11 | |
| Plate 1 x 2 | 3023 | Light Bluish Gray | 11 | |
| Tile 1 x 1 with Groove | 3070b | White | 10 | |
| Plate 1 x 3 | 3623 | Black | 10 | |
| Plate 1 x 12 | 60479 | Black | 10 | |
| Plate Round 1 x 1 with Solid Stud | 6141 | Orange | 10 | |
| Tile 1 x 4 with Groove | 2431 | Red | 9 | |
| Brick 1 x 1 | 3005 | Green | 9 | |
| Plate 2 x 3 | 3021 | Dark Bluish Gray | 9 | |
| Plate 1 x 4 | 3710 | Red | 9 | |
| Window 1 x 4 x 3 without Shutter Tabs | 60594 | Dark Bluish Gray | 9 | |
| Door Frame 1 x 4 x 6 Type 2 | 60596 | Dark Bluish Gray | 9 | |
| Plate 1 x 1 | 3024 | Red | 8 | |
| Plate 2 x 8 | 3034 | Dark Bluish Gray | 8 | |
| Brick Round 1 x 1 Open Stud | 3062b | Black | 8 | |
| Plate 1 x 6 | 3666 | Dark Bluish Gray | 8 | |
| Plate 1 x 4 | 3710 | Black | 8 | |
| Plate 2 x 6 | 3795 | Blue | 8 | |
| Plate 2 x 6 | 3795 | Dark Bluish Gray | 8 | |
| Plate Round 2 x 2 with Axle Hole Type 1 (+ Opening) | 4032a | Dark Bluish Gray | 8 | |
| Plate 2 x 3 | 3021 | Light Bluish Gray | 7 | |
| Plate 6 x 16 | 3027 | Dark Bluish Gray | 7 | |
| Plate 2 x 10 | 3832 | Light Bluish Gray | 7 | |
| Glass for Window 1 x 4 x 3 [Opening] | 60603 | Trans-Clear | 7 | |
| Door 1 x 4 x 6 Smooth with Chamfered Handle Plinth | 60616b | Trans-Clear | 7 | |
| Brick 1 x 2 | 3004 | Dark Bluish Gray | 6 | |
| Brick Special 1 x 4 Palisade [aka Log] | 30137 | Reddish Brown | 6 | |
| Plate 2 x 4 | 3020 | Light Bluish Gray | 6 | |
| Plate 2 x 2 | 3022 | Tan | 6 | |
| Plate 1 x 2 | 3023 | Black | 6 | |
| Plate 1 x 1 | 3024 | Dark Bluish Gray | 6 | |
| Plate 1 x 3 | 3623 | Red | 6 | |
| Plate 1 x 6 | 3666 | Light Bluish Gray | 6 | |
| Technic Brick 1 x 6 [5 Pin Holes] | 3894 | Blue | 6 | |
| Plate 2 x 16 | 4282 | Light Bluish Gray | 6 | |
| Tap 1 x 1 without Hole in Spout | 4599b | Black | 6 | |
| Tile 1 x 3 | 63864 | Red | 6 | |
| Plant, Leaves 4 x 3 | 2423 | Green | 5 | |
| Tile 1 x 4 with Groove | 2431 | Black | 5 | |
| Brick 2 x 2 | 3003 | Tan | 5 | |
| Plate 1 x 2 | 3023 | Dark Bluish Gray | 5 | |
| Plate 4 x 10 | 3030 | Dark Bluish Gray | 5 | |
| Plant, Plate 1 x 1 Round with 3 Leaves | 32607 | Green | 5 | |
| Plant, Plate 1 x 1 Round with 3 Leaves | 32607 | Olive Green | 5 | |
| Plate 1 x 8 | 3460 | Light Bluish Gray | 5 | |
| Plate 1 x 8 | 3460 | Dark Bluish Gray | 5 | |
| Brick 2 x 2 | 3003 | Trans-Brown | 4 | |
| Brick 1 x 4 | 3010 | White | 4 | |
| Plate 2 x 2 | 3022 | Reddish Brown | 4 | |
| Plate 4 x 12 | 3029 | Light Bluish Gray | 4 | |
| Plate 2 x 8 | 3034 | Light Bluish Gray | 4 | |
| Brick Round 1 x 1 Open Stud | 3062b | Orange | 4 | |
| Tile 1 x 2 with Groove | 3069b | Black | 4 | |
| Tile 1 x 1 with Groove | 3070b | Yellow | 4 | |
| Brick 1 x 3 | 3622 | White | 4 | |
| Plate 1 x 3 | 3623 | Dark Bluish Gray | 4 | |
| Plate 2 x 6 | 3795 | Light Bluish Gray | 4 | |
| Plate 1 x 10 | 4477 | Light Bluish Gray | 4 | |
| Dish 2 x 2 Inverted [Radar] | 4740 | Black | 4 | |
| Brick Special 1 x 1 with Stud on 1 Side | 87087 | Black | 4 | |
| Brick 2 x 2 | 3003 | Red | 3 | |
| Plate 2 x 2 | 3022 | White | 3 | |
| Plate 1 x 2 | 3023 | Reddish Brown | 3 | |
| Plate 4 x 6 | 3032 | Light Bluish Gray | 3 | |
| Plate 4 x 8 | 3035 | Dark Bluish Gray | 3 | |
| Plate 6 x 8 | 3036 | Dark Bluish Gray | 3 | |
| Tile 1 x 1 with Groove | 3070b | Medium Azure | 3 | |
| Plate 1 x 8 | 3460 | Yellow | 3 | |
| Plate 2 x 10 | 3832 | Dark Bluish Gray | 3 | |
| Plate Round 2 x 2 with Axle Hole Type 1 (+ Opening) | 4032a | Black | 3 | |
| Plate 1 x 10 | 4477 | Reddish Brown | 3 | |
| Plate 2 x 12 | 2445 | Light Bluish Gray | 2 | |
| Brick 2 x 4 | 3001 | White | 2 | |
| Brick 1 x 2 | 3004 | Dark Green | 2 | |
| Brick 1 x 1 | 3005 | Blue | 2 | |
| Brick 1 x 1 | 3005 | Medium Azure | 2 | |
| Brick 1 x 6 | 3009 | White | 2 | |
| Plate 2 x 4 | 3020 | White | 2 | |
| Plate 2 x 4 | 3020 | Dark Bluish Gray | 2 | |
| Plate 2 x 3 | 3021 | Dark Tan | 2 | |
| Plate 2 x 2 | 3022 | Dark Blue | 2 | |
| Plate 2 x 2 | 3022 | Dark Orange | 2 | |
| Plate 4 x 4 | 3031 | Light Bluish Gray | 2 | |
| Plate 4 x 6 | 3032 | White | 2 | |
| Plate 2 x 8 | 3034 | White | 2 | |
| Brick Round 1 x 1 Open Stud | 3062b | Blue | 2 | |
| Brick Round 1 x 1 Open Stud | 3062b | Light Bluish Gray | 2 | |
| Brick Round 1 x 1 Open Stud | 3062b | Dark Bluish Gray | 2 | |
| Plate 1 x 8 | 3460 | Black | 2 | |
| Plate 1 x 6 | 3666 | Reddish Brown | 2 | |
| Brick Special 1 x 1 with Headlight | 4070 | Blue | 2 | |
| Plate 1 x 10 | 4477 | Dark Bluish Gray | 2 | |
| Cone 1 x 1 [No Top Groove] | 4589 | Light Bluish Gray | 2 | |
| Plant, Bush 2 x 2 x 4 | 6064 | Green | 2 | |
| Plant, Bush 2 x 2 x 4 | 6064 | Dark Green | 2 | |
| Plate Round 1 x 1 with Solid Stud | 6141 | Blue | 2 | |
| Plate Round 1 x 1 with Solid Stud | 6141 | Dark Bluish Gray | 2 | |
| Tile 1 x 3 | 63864 | Black | 2 | |
| Brick Special 1 x 1 with Stud on 1 Side | 87087 | White | 2 | |
| Plate 8 x 16 | 92438 | Light Bluish Gray | 2 | |
| Brick Curved 4 x 2 No Studs | 93606 | Olive Green | 2 | |
| Plant, Leaves 4 x 3 | 2423 | Dark Green | 1 | |
| Barrel 2 x 2 x 2 | 2489 | Reddish Brown | 1 | |
| Barrel 2 x 2 x 2 | 2489 | Dark Bluish Gray | 1 | |
| Brick 2 x 3 | 3002 | Olive Green | 1 | |
| Brick 2 x 2 | 3003 | Yellow | 1 | |
| Brick 1 x 2 | 3004 | Light Bluish Gray | 1 | |
| Brick 1 x 1 | 3005 | Light Bluish Gray | 1 | |
| Brick 2 x 8 | 3007 | Tan | 1 | |
| Brick 1 x 8 | 3008 | White | 1 | |
| Brick 1 x 8 | 3008 | Dark Orange | 1 | |
| Brick 1 x 6 | 3009 | Dark Orange | 1 | |
| Plate 2 x 4 | 3020 | Tan | 1 | |
| Plate 2 x 4 | 3020 | Reddish Brown | 1 | |
| Plate 2 x 3 | 3021 | Tan | 1 | |
| Plate 2 x 2 | 3022 | Dark Bluish Gray | 1 | |
| Plate 1 x 2 | 3023 | Yellow | 1 | |
| Plate 1 x 2 | 3023 | Dark Green | 1 | |
| Plate 1 x 2 | 3023 | Olive Green | 1 | |
| Plate 6 x 12 | 3028 | Dark Bluish Gray | 1 | |
| Plate 4 x 10 | 3030 | White | 1 | |
| Plate 4 x 4 | 3031 | Dark Bluish Gray | 1 | |
| Plate 4 x 6 | 3032 | Dark Bluish Gray | 1 | |
| Plate 6 x 10 | 3033 | Dark Bluish Gray | 1 | |
| Plate 2 x 8 | 3034 | Olive Green | 1 | |
| Plate 2 x 8 | 3034 | Dark Orange | 1 | |
| Brick Sloped 45° 2 x 1 with Bottom Pin | 3040b | Black | 1 | |
| Plate 1 x 8 | 3460 | Reddish Brown | 1 | |
| Plate 1 x 6 | 3666 | Yellow | 1 | |
| Plate 1 x 4 | 3710 | White | 1 | |
| Plate 6 x 6 | 3958 | Light Bluish Gray | 1 | |
| Plate 1 x 10 | 4477 | White | 1 | |
| Cone 1 x 1 [No Top Groove] | 4589 | Orange | 1 | |
| Dish 2 x 2 Inverted [Radar] | 4740 | Dark Bluish Gray | 1 | |
| Brick 1 x 10 | 6111 | White | 1 | |
| Brick Special 1 x 1 with Stud on 1 Side | 87087 | Green | 1 | |
| Brick Special 1 x 1 with Stud on 1 Side | 87087 | Red | 1 | |
| Brick Special 1 x 1 with Stud on 1 Side | 87087 | Light Bluish Gray | 1 |
Part and colour numbers follow the Rebrickable catalogue, and every part is made in the colour listed. The CSV has one line per part and colour: Part, Color, Quantity. Pick a bag above to see, copy or download just that bag.
// Techniques and display
Tips
A few techniques do the heavy lifting in this build. Worth a read before you start.
The sign
The sign is built flat on the table, face up: a black frame of two rails and four uprights, spacers, red plates for the letters and red tiles on their faces. Stood up, the middle rail clicks onto the side studs of four posts on the beam.
Every stroke that isn't on a rail or a spacer runs straight up or down onto one inside its own letter, which is what holds the legs of the R and the K.
Roof on walls and columns
The roof is built flat on the table and lowered on in one piece. It lands on the fascia all round and on thirteen grey columns standing in the aisles.
No part of the roof is more than about 7 studs from a wall or a column under it, so it doesn't sag.
Pegboard shelving
Each shelving run is a stack of 4-wide white plates with two rows of Technic bricks between them. The holes read as the pegboard, and the plates' outer studs are the shelf edges the goods stand on.
Locking the back block on
The back block's roof starts with 2 × 12 plates that run on one stud onto the hall's back wall and finish its trim, so the two buildings lock together and every edge of that roof sits on a wall.
Side studs
The ladder, the round vent and the recycler's door all click onto bricks with a stud on their side, set into the walls as you build them.
Handling and display
Lift the store by the lot, never by the sign or the roof.
A shelf for it needs about 60 × 50 cm and 22 cm of height.
// Questions
FAQ
The short answers, before you order a single brick.
Is this an official LEGO® set?
No. It's a free, fan-made design by PropBuilds. Every piece is a standard brick part, and the parts list gives the Rebrickable part and colour numbers so you can buy exactly the pieces you need.
How many pieces is it, and how big is it?
2,542 pieces in 11 bags and 72 steps. The finished model is about 22 × 18 in (56 × 46 cm) with its lot, and 7 in (19 cm) tall.
Where do I get the parts?
Download the parts list as a CSV: one line per part and colour, with Rebrickable part and colour numbers and the quantity. You can import it into a parts list on Rebrickable and shop it from there, or look the numbers up on any brick parts marketplace. Every part is made in the colour listed.
How hard is it to build?
I'd call it intermediate. Most of it is building walls course by course and laying plates. The trickiest parts are the sign, which is built flat and then clicked onto side studs on its posts, and the roof, which goes on in one piece.
Has it been built in real bricks?
Not yet. Every piece is checked in software: it clutches studs or sits on a clip or a side stud, the build stays in one piece at every checkpoint, and both roofs rest on walls and columns, with no point more than about 7 studs from a support. I haven't built this one in real bricks yet.
Is PropBuilds affiliated with Facepunch or the LEGO Group?
No. This guide is fan-made and not affiliated with or endorsed by Facepunch Studios or the LEGO Group.
// Small print
Notes
What's checked
- Every piece clutches studs or sits on a clip or a side stud, and the build stays in one piece at every checkpoint. That is checked in software, piece by piece.
- Both roofs are checked for span as well: every point sits within about 7 studs of a wall or column under it.
- Every part is made in the colour listed, per the Rebrickable catalogue.
- I haven't built this one in real bricks yet.
Accuracy
- Layout, proportions and details are my reading of the monument from screenshots, not a survey.
- The sign's letters are bigger than the real ones so they stay readable in bricks.
- The hall is 60 × 36 studs (480 × 288 mm).
Fan-made
- A fan-made model inspired by a monument in Rust.
- Not affiliated with or endorsed by Facepunch Studios.
More for Rust
- Sphere Tank brick build: the rusty sphere on its eight columns, its walkways and ramps, the deck and the silos, bag by bag.
- The best video game LEGO sets: 18 boxed sets, from the Game Boy and PAC-MAN to Pokémon and Zelda, if you would rather build a set.
- Rust items in real life: official merch partners, replica props, tools and print files, in one guide.
- Rust player toolbox: one directory of the sites and tools worth having open on wipe day.
- Rust 3D print library: Rust STL files for the AK, Eoka, facemasks and more, each linked to its maker.
- Rust force wipe countdown: the next monthly force wipe, counting down in your time zone.
- PropBuilds DIY kits: my own Rust build kits: the Hackable Crate, the Shotgun Trap and the Minicopter.
PropBuilds brick guides are fan-made and not affiliated with or endorsed by Facepunch Studios.
LEGO® is a trademark of the LEGO Group, which does not sponsor, authorize or endorse this guide. Part names and numbers are used only to identify pieces.