I'm Brent, and I make every PropBuilds kit myself, from the first CAD sketch to the box that lands on your doorstep. People sometimes assume there's a warehouse behind a shop like this. There isn't. It's me, a few 3D printers, a small home workshop, and a process I've been refining since the first kit.
This is what actually happens between "I want to make a kit of that" and "your tracking number just shipped."
1. Picking What to Make
Not every in-game item makes a good prop kit. The first filter is what I call the recognizability test: if I held the finished build up at a Rust LAN, would a player know exactly what it is without me telling them?
The Minicopter passes instantly. So does the Hackable Crate. The Shotgun Trap is recognized by anyone who's been raided.
The second filter is whether the geometry can survive being broken into printable parts that go back together cleanly. Some items in Rust look amazing in-game but turn into impossible jigsaw puzzles when you try to make them as a buildable kit. Those get shelved. The ones that pass both tests move into design.
2. Modeling the Geometry
I model each kit in CAD from scratch. There's no ripping of game assets, partly for the IP reasons (PropBuilds is fan-made, not licensed), and partly because game models aren't built for being 3D printed and hand-assembled. Walls are too thin. Mating surfaces don't exist. Tolerances are zero.
So I start with reference screenshots from a few angles and rebuild the piece part-by-part. Proportions get pulled toward what looks right on a shelf, which isn't always what looks right at gameplay scale. Then I split the model into print-friendly pieces, usually 20 to 40 parts depending on the kit, and design each one so it can be press-fit or fastened to its neighbors.
3. Print Profile
Everything I sell prints in Polymaker Panchroma Matte PLA. I tested a few other filaments early on and kept coming back to it. The matte finish hides layer lines cleanly, the color stays consistent batch to batch, and the dimensional accuracy is tight enough that the press-fit kits actually press-fit on the first attempt.
Layer height, infill, supports, and orientation are tuned per part. Some pieces need to look smooth from every angle (no support scarring). Some need internal strength because they hold the structure together. A few benefit from a deliberate texture from being printed face-down. None of that is something a customer should have to think about, but it's a real part of why a kit feels right when it's assembled.
4. Press-Fit or Screws?
The biggest design decision on every kit is how the parts connect. I've settled into two approaches, and which one a kit gets depends on what the finished build needs to feel like.
Press-Fit (Hackable Crate)
No glue, no screws, no tools. Parts snap together with a deliberate friction fit and stay there. This works for kits where the geometry is mostly box-and-panel: flat planes meeting at right angles, where the tolerance of the print is enough to hold pieces in place.
Press-fit is the friendliest assembly experience. You can build the kit in 5 to 10 minutes, take it apart again if you want to, and there's no risk of overtightening or stripping a screw. The Hackable Crate has 26 parts and goes from box to display in under 10 minutes.

Screws and Tool (Minicopter, Shotgun Trap)
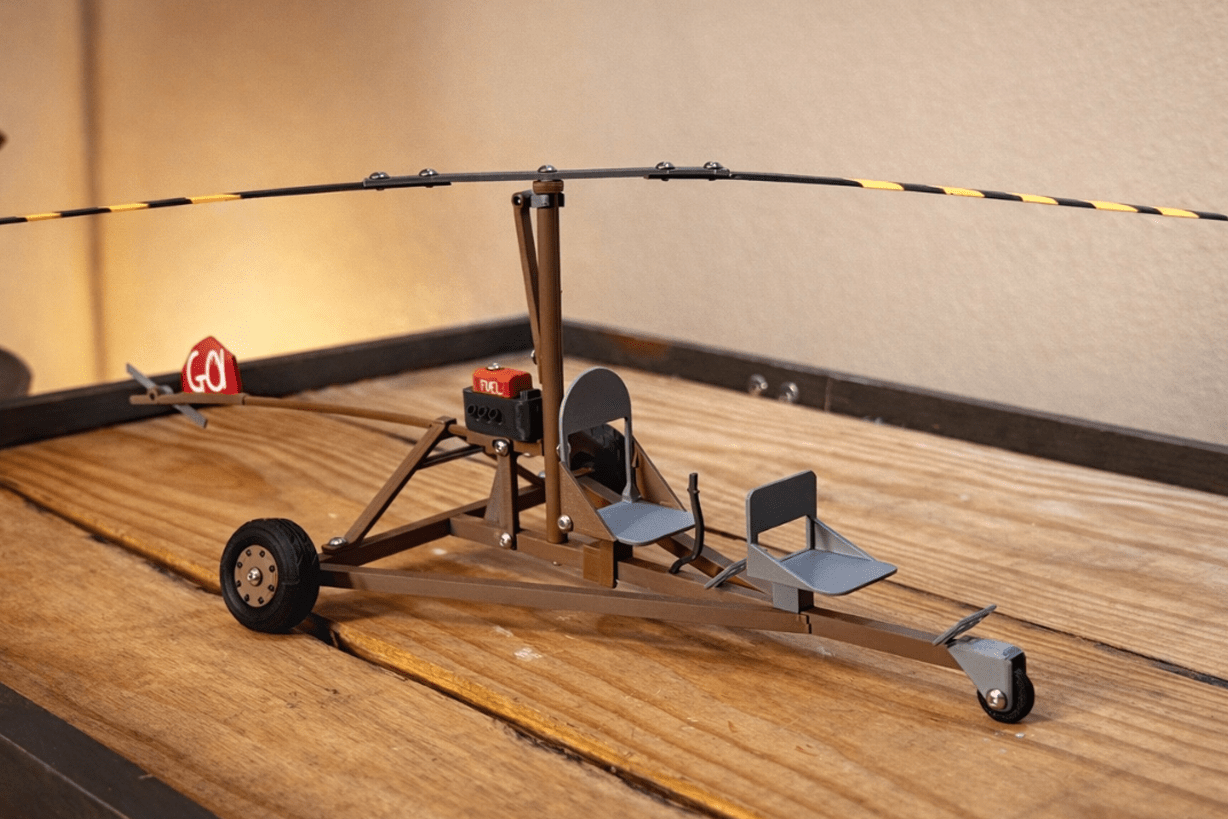
The Minicopter and Shotgun Trap need mechanical strength that press-fit can't deliver. The Minicopter's rotor, propeller, and wheels all need to spin freely under finger pressure, which means axle joints, and axle joints need fasteners. The Shotgun Trap's trigger mechanism and the way the parts overlap require the same.
So those kits ship with M4 screws and an Allen key. The Minicopter uses 29 screws plus extras. The build takes 20 to 25 minutes. It's a longer experience but you end up with a piece that has moving parts, and the kit doesn't fall apart if you knock it off a shelf.

5. Quality Check and Packing
Every print comes off the bed and gets inspected by hand. I look at every visible surface for stringing, missed support, dimensional drift, or any cosmetic flaw I'd be annoyed by if it landed on my own shelf. Parts that don't pass go back into the queue.
Then each kit gets packed: all parts in compartmentalized layers so they don't rattle against each other in transit, a printed assembly guide with QR-linked video instructions, the hardware where applicable, and the green PropBuilds keycard. Every box is hand-packed. No subscription fulfillment service in the middle.

6. Shipping
Kits ship via USPS or UPS depending on weight and destination. Most US orders land in 3 to 5 business days. International orders to Australia, the UK, Canada, and parts of Europe run 7 to 14 days, sometimes faster.
If something arrives damaged or a part missed inspection, I replace it. I get those emails personally; there's no support ticket queue. It's the same address you'd email the company at and the same person reading it.
7. Why I Print and Ship Every Kit Myself
I get asked occasionally why I haven't handed production off to a print-on-demand service or a fulfillment warehouse. Two reasons.
The first is quality. Every kit is something I'd be willing to put on my own desk. Outsourcing means giving up the inspection step, and I've seen what that does to small-batch products. The press-fit tolerance on the Hackable Crate is tight enough that a 0.2mm drift in a print profile breaks the build. A warehouse won't catch that.
The second is that this is still a hobby that became a business. I like designing kits. I like the moment a customer's video shows up with a finished build. I like that the people who get a kit from me are getting it from me, not from a printer farm running my files. As long as that stays sustainable, that's how it'll stay.
The Catalog So Far
Three kits live, with more coming.
- Rust Minicopter DIY Build Kit: 29-screw build, free-rotating rotor and propeller, custom adjustable display stand. 20 to 25 minute assembly.
- Rust Shotgun Trap DIY Build Kit: screw-fastened, premium matte PLA, all hardware and tool included. 15 to 20 minute assembly.
- Rust Hackable Crate DIY Build Kit: 26-part press-fit. No tools required. Internal compartments double as small storage. 5 to 10 minute assembly.
If you have a Rust item you'd want to see become a kit, the best way to nudge it onto the roadmap is to tag @SometimesLone on TikTok or Instagram. I read all of that and the suggestions actually shape what comes next.
Brent is the founder of PropBuilds and the creator behind @SometimesLone. He designs, 3D prints, packs, and ships every PropBuilds kit himself. Fan-made decorative build kits. Not affiliated with or endorsed by Facepunch Studios.